Managing Data
Data Depot
The Data Depot is the data repository for DesignSafe. The web interface to the Data Depot allows you to browse, upload, download, share, curate and publish data stored within the repository. You are encouraged to use the Data Depot not only for curation and publication of research results, but as a working "scratch" area for any of your own data and work in progress. Scientific applications in the Tools & Applications area can access your Data Depot files, enabling data analysis directly in the DesignSafe portal that minimizes the need to transfer data to your laptop. The Data Depot hosts both public and private data associated with a project, with the following directories:
- My Data: Private directory for your data.
- HPC Work: Work directory on TACC HPC machines for use with Jupyter.
- My Projects: Data to be curated and published must be in this directory. Also has group access that you control.\
- Shared with Me: DEPRECATED. Use My Projects. Legacy directory we are no longer utilizing, but some very early users may have data.
- Box.com: Access to your Box files for copying to DesignSafe.
- Dropbox.com: Access to your Dropbox for copying to DesignSafe.
- Google Drive: CURRENTLY NOT FUNCTIONAL. Google has made changes that we are working through to reenable.
- Published: Curated data/projects with DOI's.
- Published (NEES): Curated data/projects from NEES program that ran from 1999 - 2015.
- Community Data: Non-curated user-contributed data.
Browsing, Upload, and Download
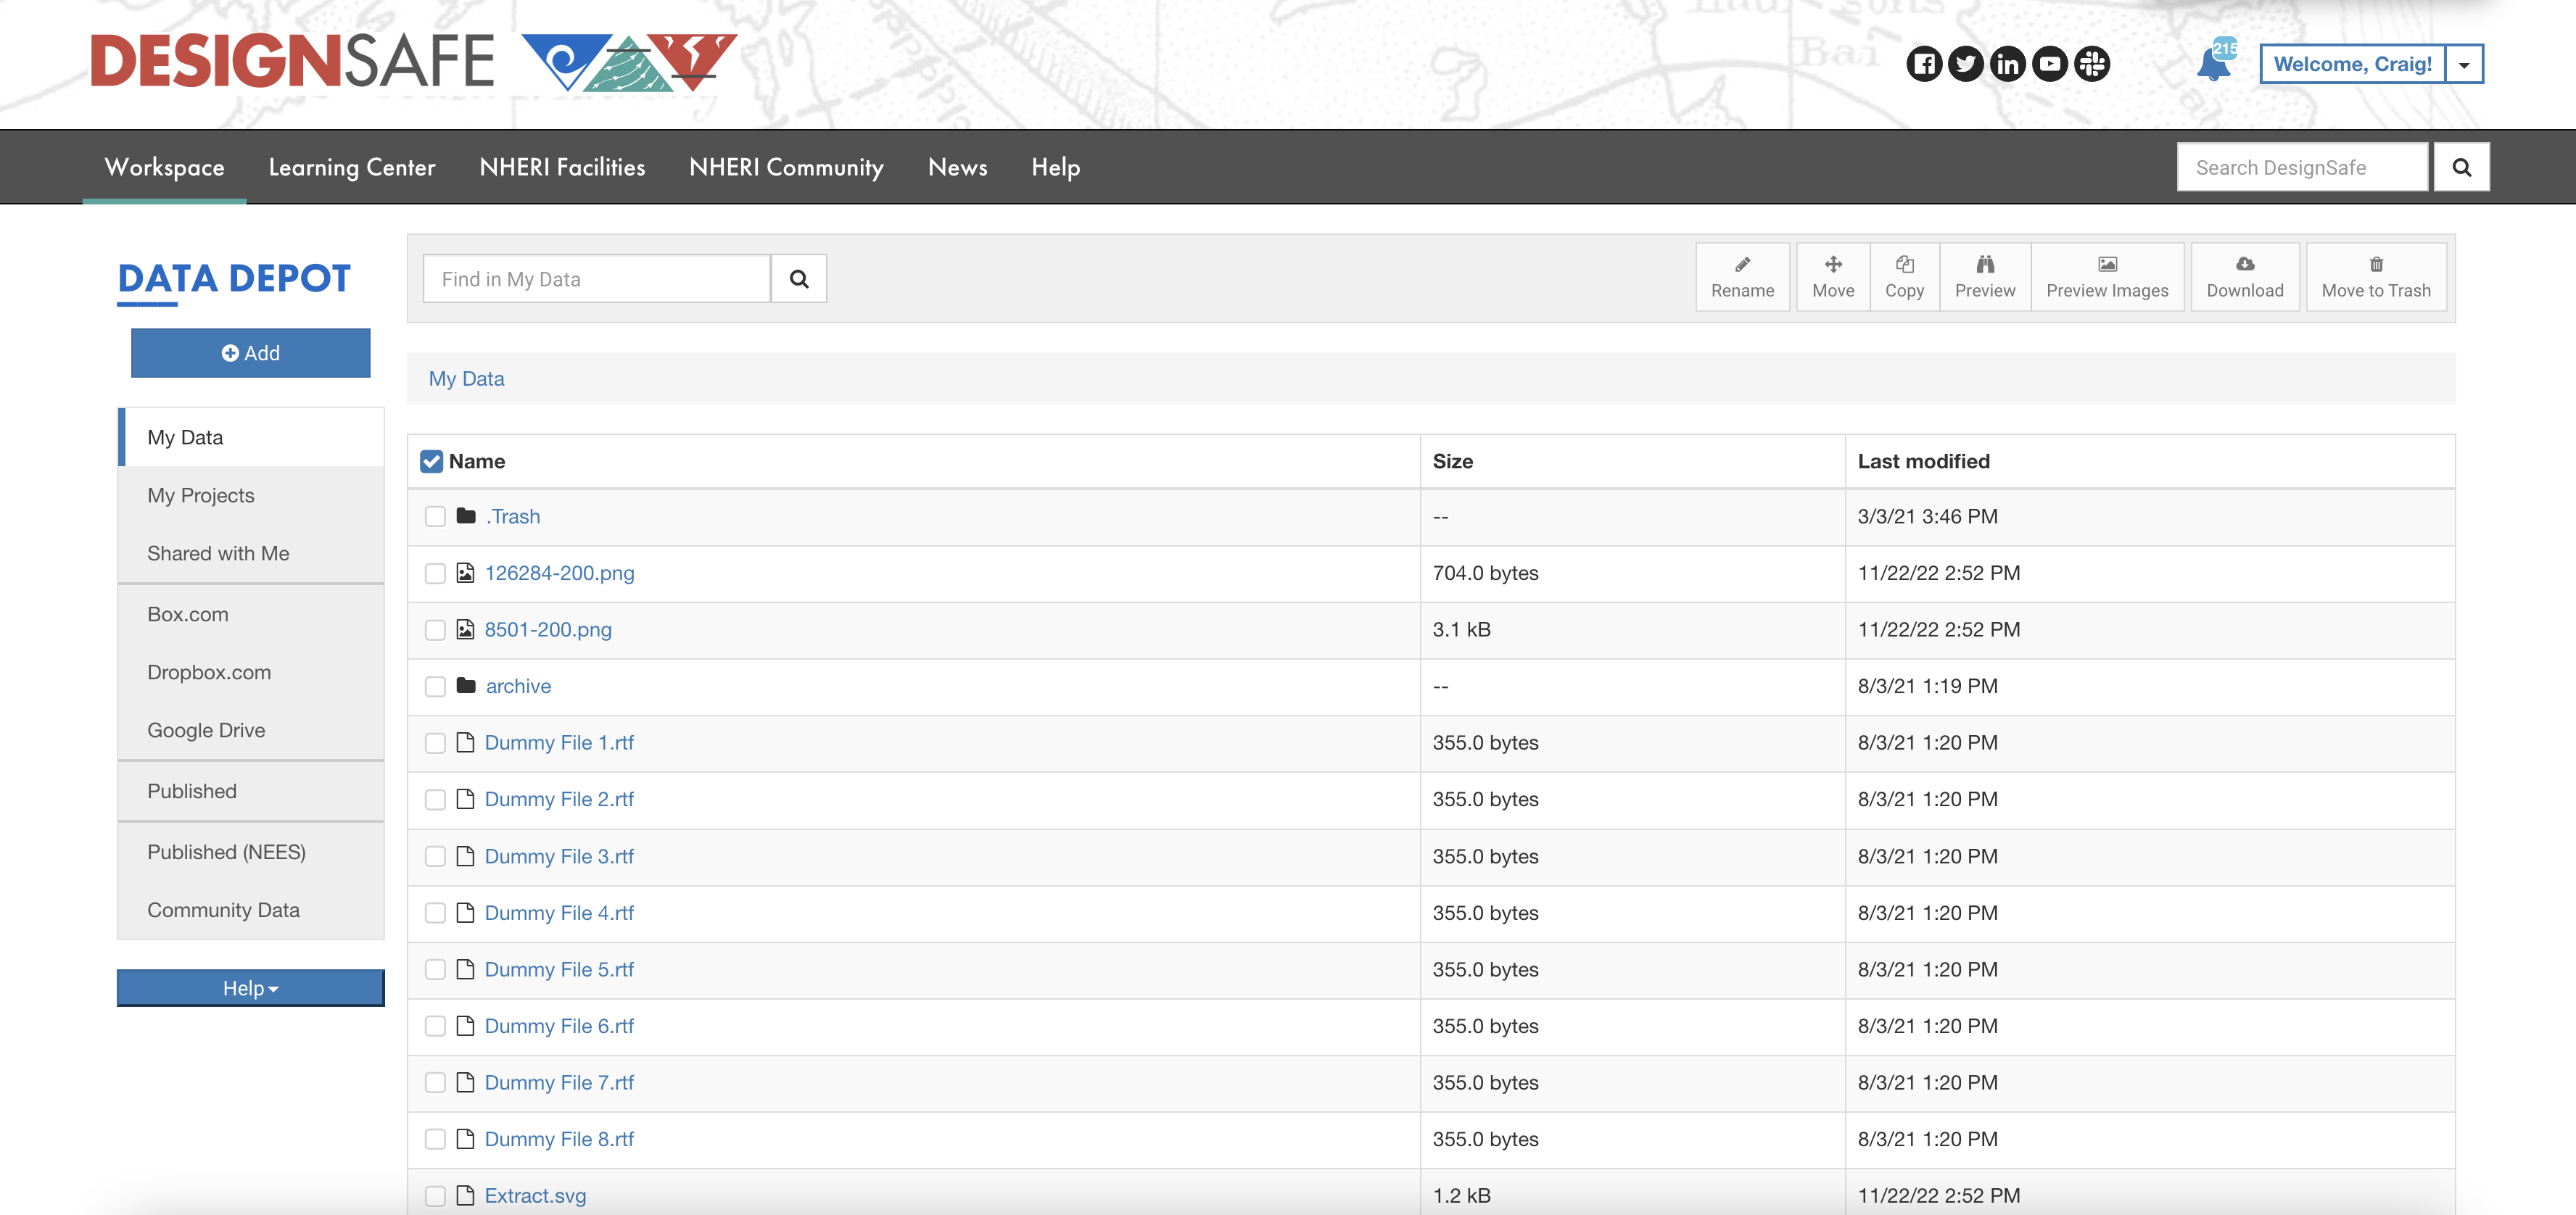
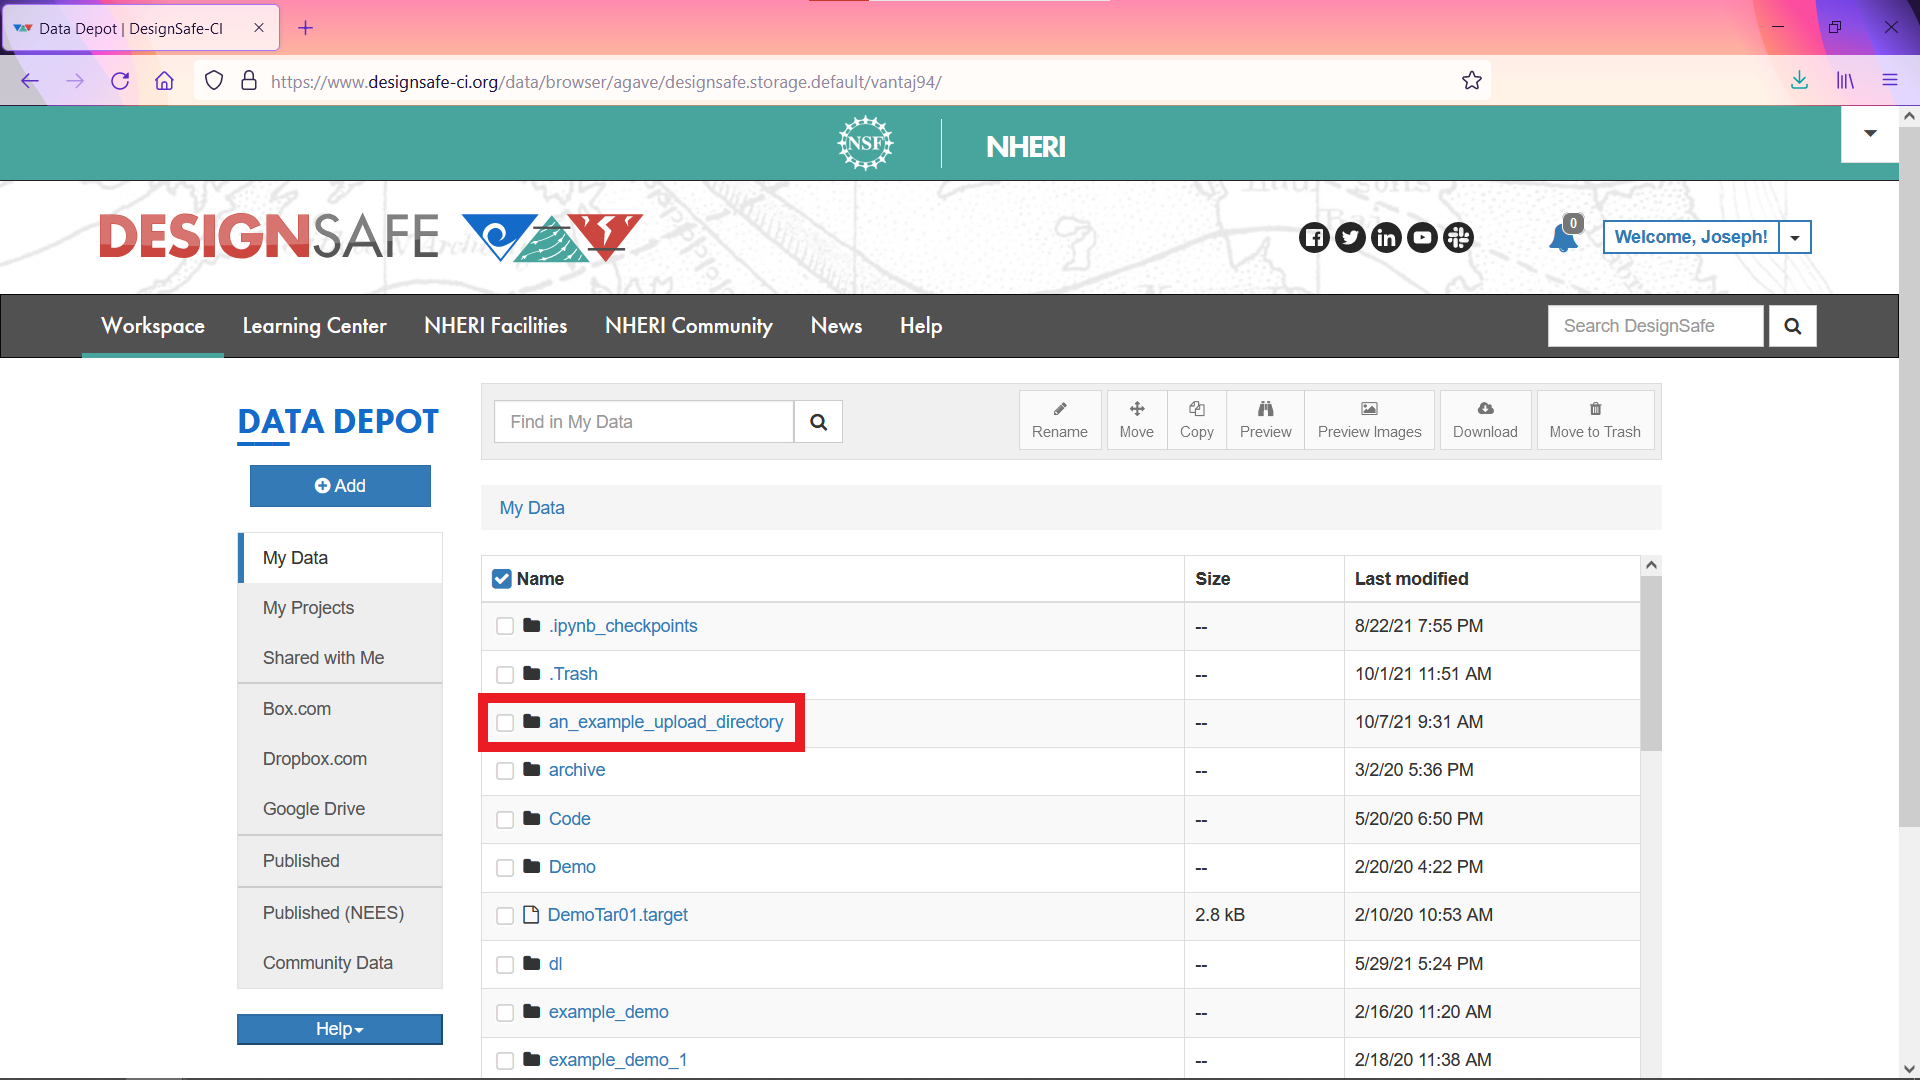
Figure 1. Data Depot "My Data" screenshot
The Data Depot provides a user interface with a familiar desktop metaphor for manipulating files. The UI for a typical Data Depot window is shown in Figure 1 above. On the left is your directory tree (My Data, etc), and on the right are the files and folders within the currently selected directory. Folders can be navigated simply by clicking on the name of the folders. Clicking on the name of a file will pop up a preview of the file.
The Data Depot is searchable using the "Find in
Alongside the search, buttons are available for a number of file and folder actions. The Rename, Move, Copy, Download, etc. actions all behave as one would expect.
Click on the blue "+Add" button above the list of directories to create a New Folder, a New Project in My Projects, to do a File Upload or a Folder upload or for Bulk Data Transfer instructions. Note that only Chrome supports browser-based Folder uploads.
A number of data transfer methods are supported for uploading and downloading files. The Data Transfer Guide provides details regarding the various methods and recommendations based on the quantity and size of your files.
Data Sharing, Collaboration, Curation & Publication
My Projects is the simplest way to share data with your collaborators and to curate and ultimately publish your data and receive a Digital Object Identifier (DOI). Any team member in a project has both read and write access to the entire contents of the project. The Data Curation & Publication User Guide provides instructions for creating projects, managing team members, curating and publishing your data.
Setting Path to DS on Corral
The data stored on DesignSafe resides on the large (40 PB), shared data resource Corral located at the Texas Advanced Computing Center. Importantly, Corral services many different projects, not only DesignSafe, and as such utilizes a complex file structure for organization. The purpose of this documentation is to explain how to navitage this complex file structure to locate the directories pertinent to your data transfer needs on DesignSafe.
There are four main locations for data transfers on DesignSafe: My Data, My Projects, Published, and Published (NEES), they are each presented in detail below.
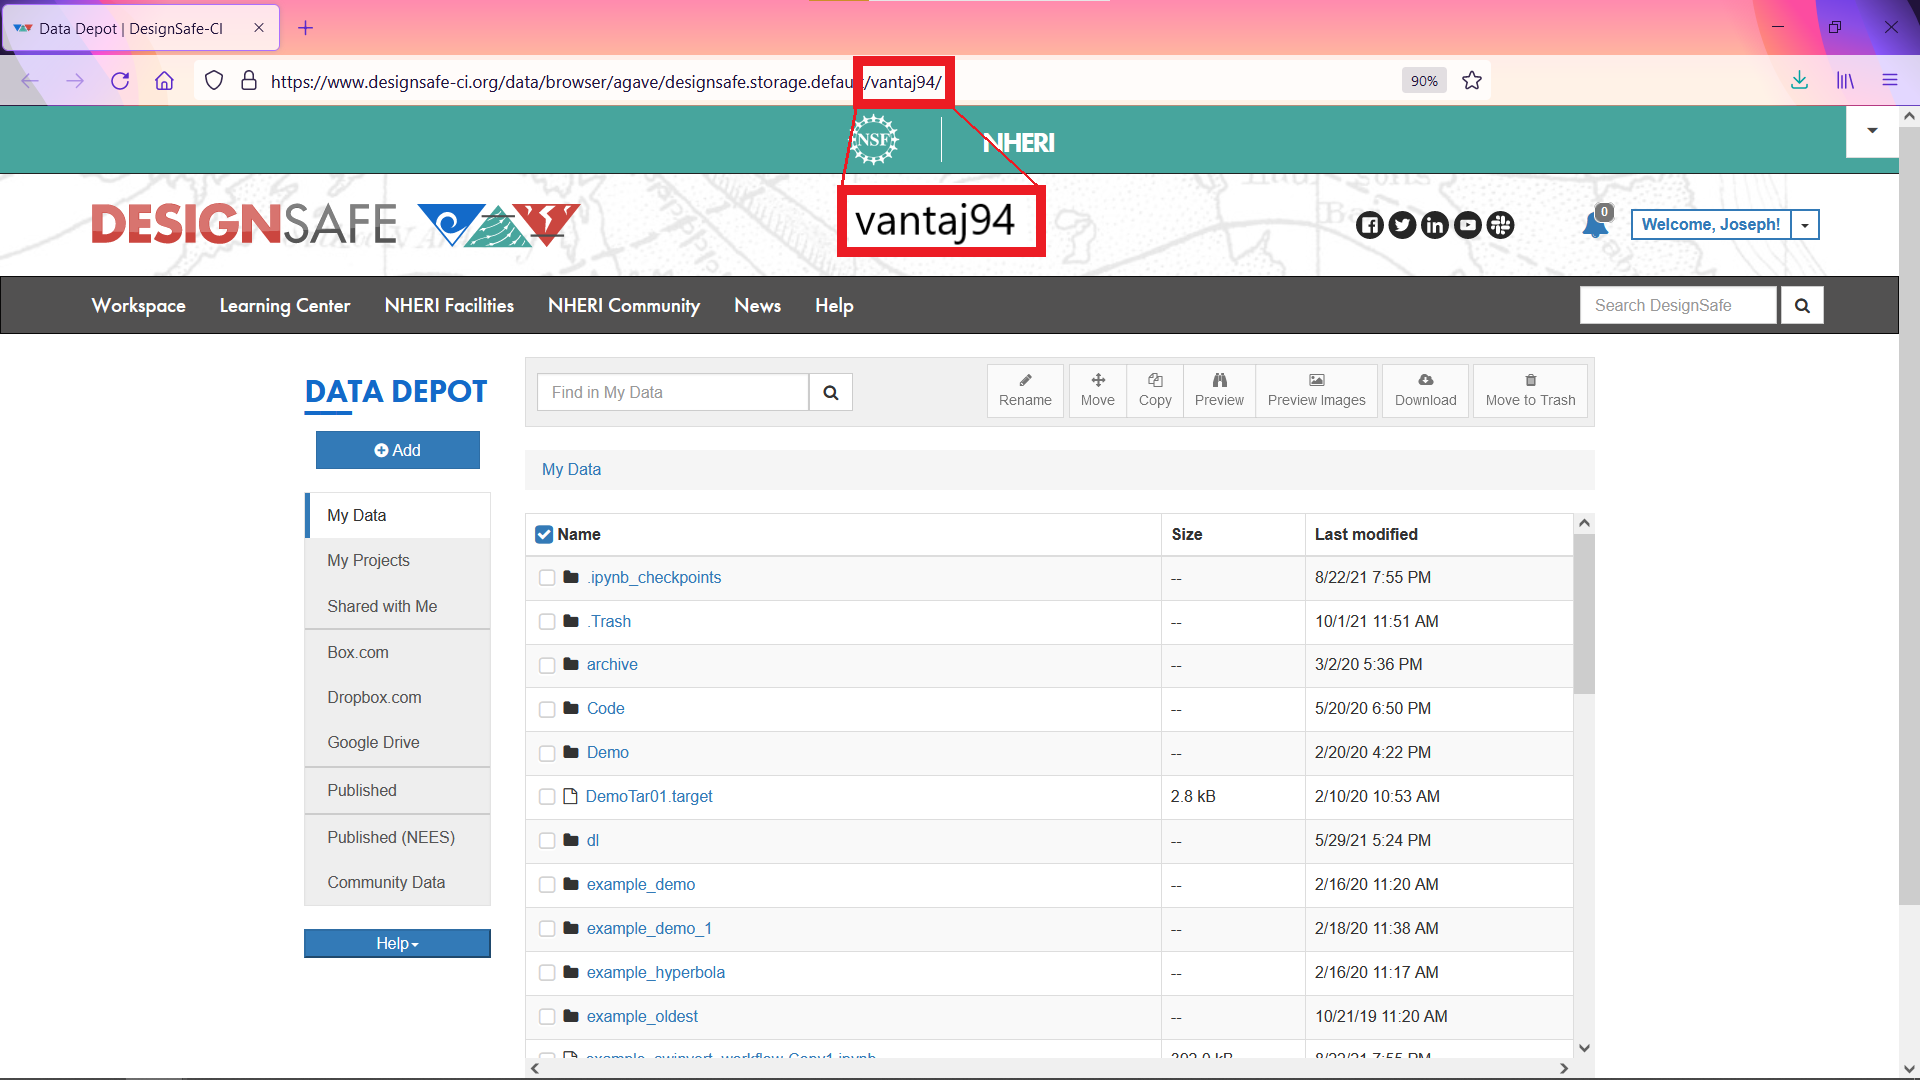
Path to My Data
For My Data set Path to /data/designsafe/mydata/<username>/
Replace <username> with your username. You can find your username by examining the URL in My Data, see figure below.
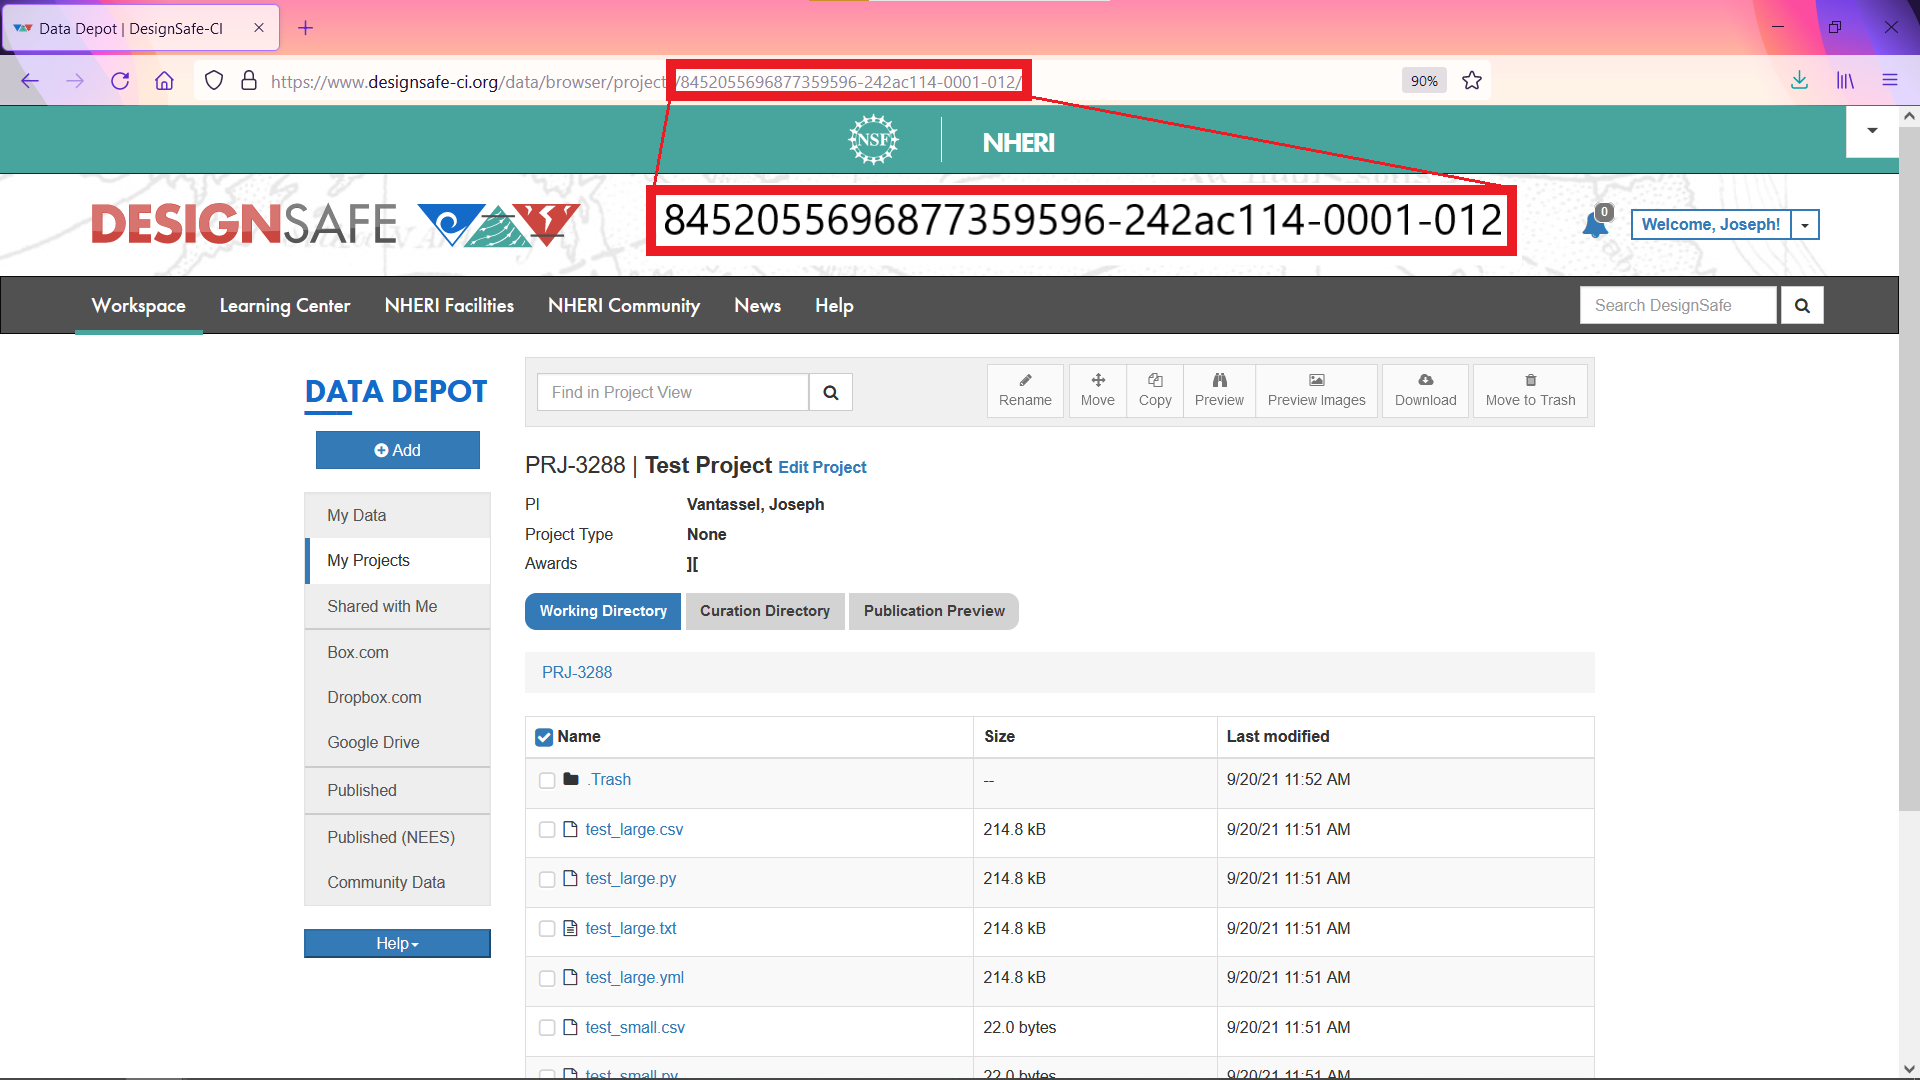
Path to My Projects
For My Projects set Path to /corral/projects/NHERI/projects/<project-uid>/
Replace <project-uid> with your projects unique identifier (UID). You can find your projects UID by examining the URL in My Projects, see figure below.
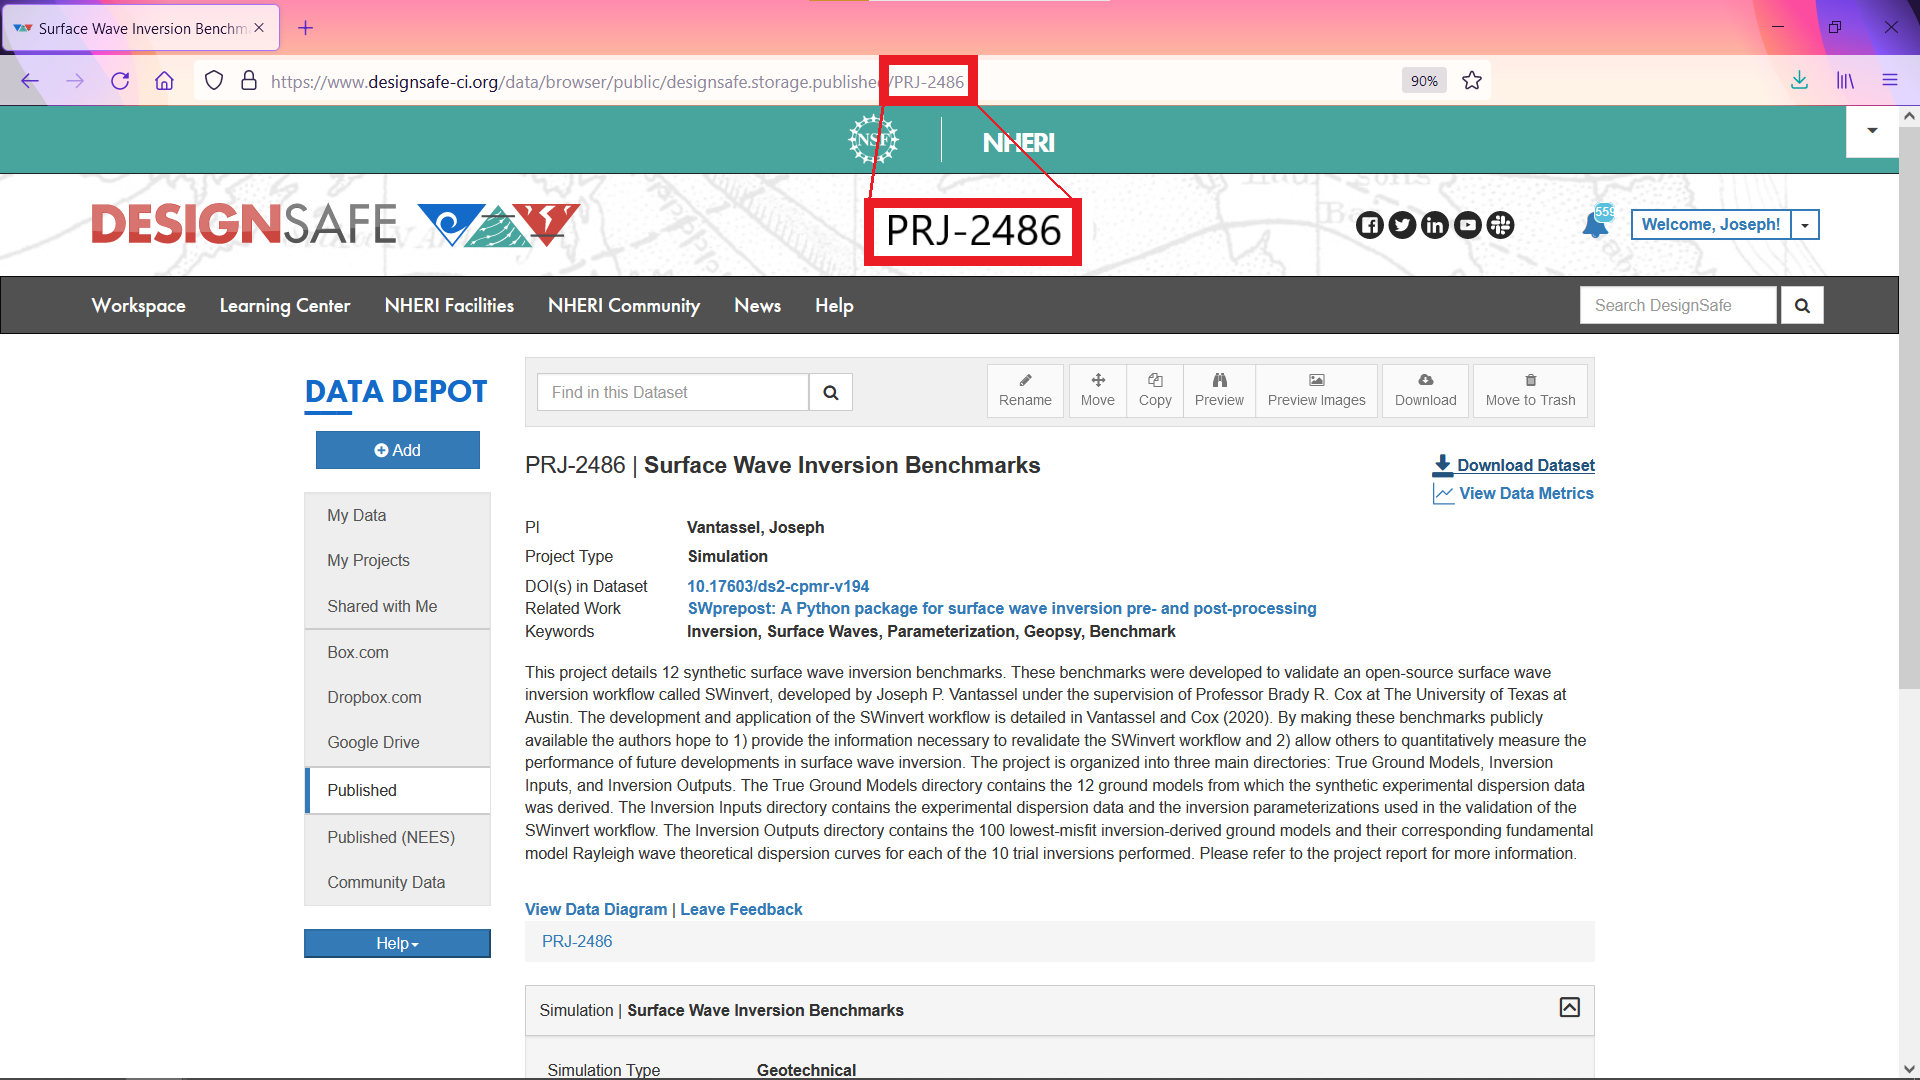
Path to Published
For Published DesignSafe projects set Path to /corral/projects/NHERI/published/<PRJ-XXXX>
Replace <PRJ-XXXX> with your project's number. You can find your project number by examining the URL in Published, see figure below.
Path to Published (NEES)
For Published (NEES) projects set Path to /corral/projects/NHERI/public/projects/<NEES-XXXX-XXXX.groups>
Replace <NEES-XXXX-XXXX.groups> with the NEES project number. You can find the NEES project number by examining the URL in Published (NEES), see figure below.

If you have any issues setting the path to DesignSafe on Corral, please create a ticket (https://designsafe-ci.org/help).
Data Transfer Guides
DesignSafe supports multiple ways of moving data in and out of the Data Depot, the data transfer method that is best for you will depend on the quantity of data you wish to move. There are two broad categories of data transfer methods available; we will refer to these categories as large data transfer methods and normal data transfer methods. Large data transfer methods are for situations where you want to move a large amount of data (> 2GB), a large numbers of files (> 25), or folders. Whereas normal data transfer methods are for situations where you wish to move a small amount of data (< 2GB) stored across a small number of files (< 25).
This document provides a brief description of the various methods available for moving data to DesignSafe to assist you in identifying the right data transfer method for your research needs. Once you have selected your data transfer method, each description concludes with a link to detailed instructions for initiating your transfer.
Recommended Data Transfer Methods
Recommended Large Data Transfer Methods
We define a large data transfer here as any file transfer that is > 2GB, or > 25 files or > 2 folders.
-
Globus
Globus supplies high speed, reliable, and asynchronous transfers to DesignSafe. Once setup, Globus will allow you to not only transfer files to and from DesignSafe, but also other cyberinfrastructure resources at TACC and other research centers. While the setup of Globus can take slightly longer than the other transfer methods, setup only needs to be performed once, making later transfers as fast (if not faster due to Globus' superior speed) than the other methods. For these reasons, Globus is the recommend approach for moving large quantities of data to and from DesignSafe.
See the Globus Data Transfer Guide for instructions. If you need to perform automated transfers using Globus, see the Globus CLI Automated Transfer Guide for instructions.
-
Cyberduck (recommended)
Cyberduck is an open-source client for file transfer protocols that allows you to securely connect to DesignSafe and other TACC resources without directly using the command line. Cyberduck presents a compromise between a shorter setup time than Globus but at the expense of Globus' superior speed and reliability.
See the Cyberduck Data Transfer Guide for instructions.
-
Command Line
Common command-line utilities, such as scp and rsync, may also be used to transfer large amounts of data to DesignSafe. Command line tools require the shortest setup time (assuming you have a compatible terminal), however are generally found challenging for first-time users. Therefore, command line transfers are only recommended in specific circumstances where other tools have been tried and found to be insufficient.
See the Command-Line Data Transfer Guide for instructions.
Recommended Normal Data Transfer Methods
We define a "normal" data transfer as < 2GB or < 25 files or < 2 folders
-
Data Depot's Browser-Based Interface
The Data Depot's browser interface allows you to conveniently upload and download small quantities of data as well as move and copy data between directories.
See below Data Depot's Browser-Based Data Transfer Guide for instructions.
-
JupyterHub's Browser-Based Interface
Similar to the Data Depot's browser interface, the DesignSafe JupyterHub provides a convenient way to upload and download small amounts of data.
See below JupyterHub's Browser-Based Data Transfer Guide for instructions.
-
Cloud Storage Providers (Box, Dropbox, and Google Drive)
DesignSafe provides the ability to directly transfer small amounts of data to and from your preferred cloud storage provider. DesignSafe currently supports integration with Box, Dropbox, and Google Drive. Note that DesignSafe does not synchronize your data with the selected cloud storage provider.
See Cloud Storage Data Transfer Guide below for instructions.
Globus Data Transfer Guide
Globus supplies high speed, reliable, and asynchronous transfers to DesignSafe. Once setup, Globus will allow you to not only transfer files to and from DesignSafe, but also other cyberinfrastructure resources at TACC and other research centers. While the setup of Globus can take slightly longer than the other transfer methods (see Data Transfer Guide), it only needs to be performed once, making later transfers as fast (if not faster due to Globus' superior speed) than the other methods. For these reasons, Globus is the recommend approach for moving large quantities of data to and from DesignSafe.
The following provides detailed instructions for setting up Globus access to DesignSafe.
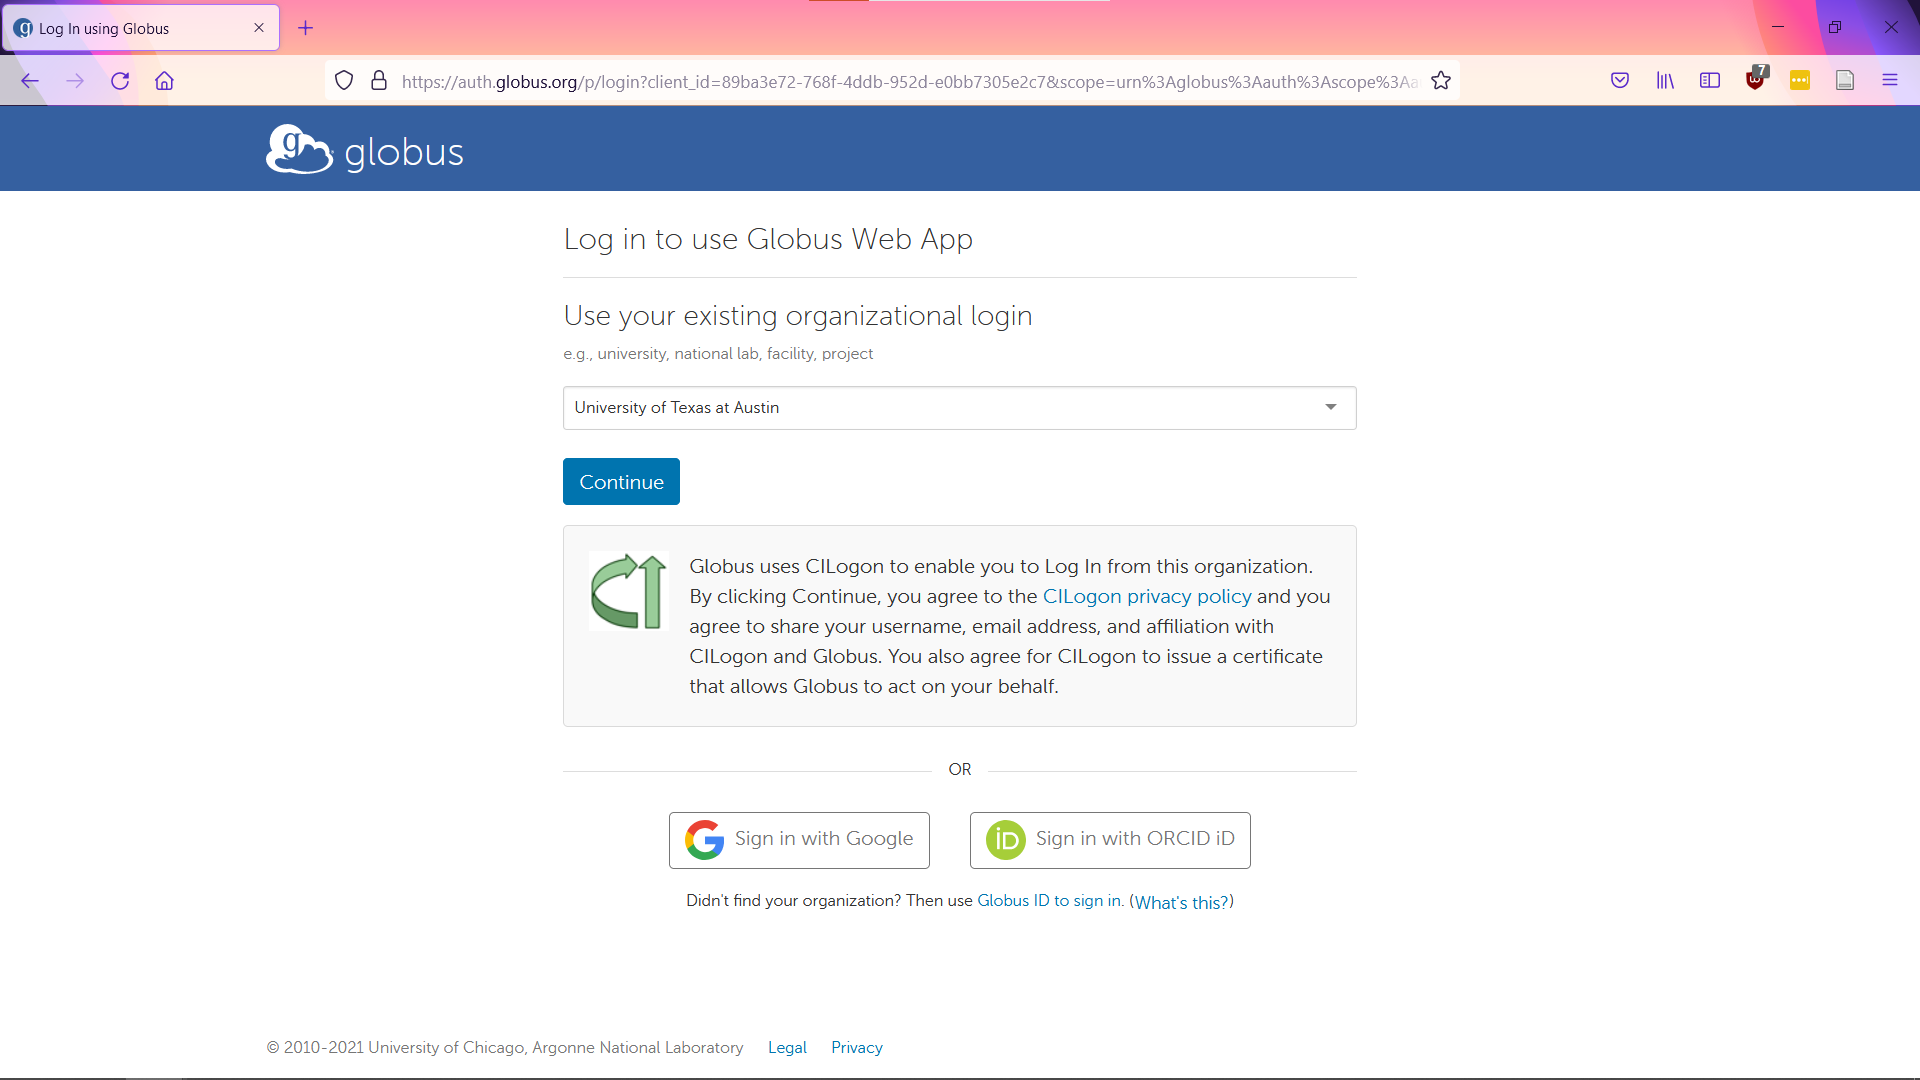
1. Log in to CILogon.org
Log in to the CILogon service (https://CILogon.org). If your institution is already a member of CILogon you can search for your institution and use your institutional credentials to log in. Otherwise, you can search for ACCESS CI (XSEDE) and proceed to create an ACCESS account.
2. Find the ePPN associated with your CILogon/Globus access
Globus requires a unique identifier, called a eduPersonPrincipalName (ePPN), for each user.
Find your ePPN associated with your Globus access by going to https://cilogon.org/ and logging in. You will find your ePPN under User Attributes
3. Associate your ePPN with your DesignSafe/TACC Account
Login to your TACC user profile here: https://accounts.tacc.utexas.edu. Select ePPN on the left menu and then enter your ePPN in the field at the top of the page and save. Allow 30 minutes for the ePPN to propagate through TACC's systems.
4. Activate Your Desktop/Laptop as a Globus Endpoint and Connect
After giving your ePPN time to propagate through the systems (up to 30 minutes), go to https://globus.org and log in.
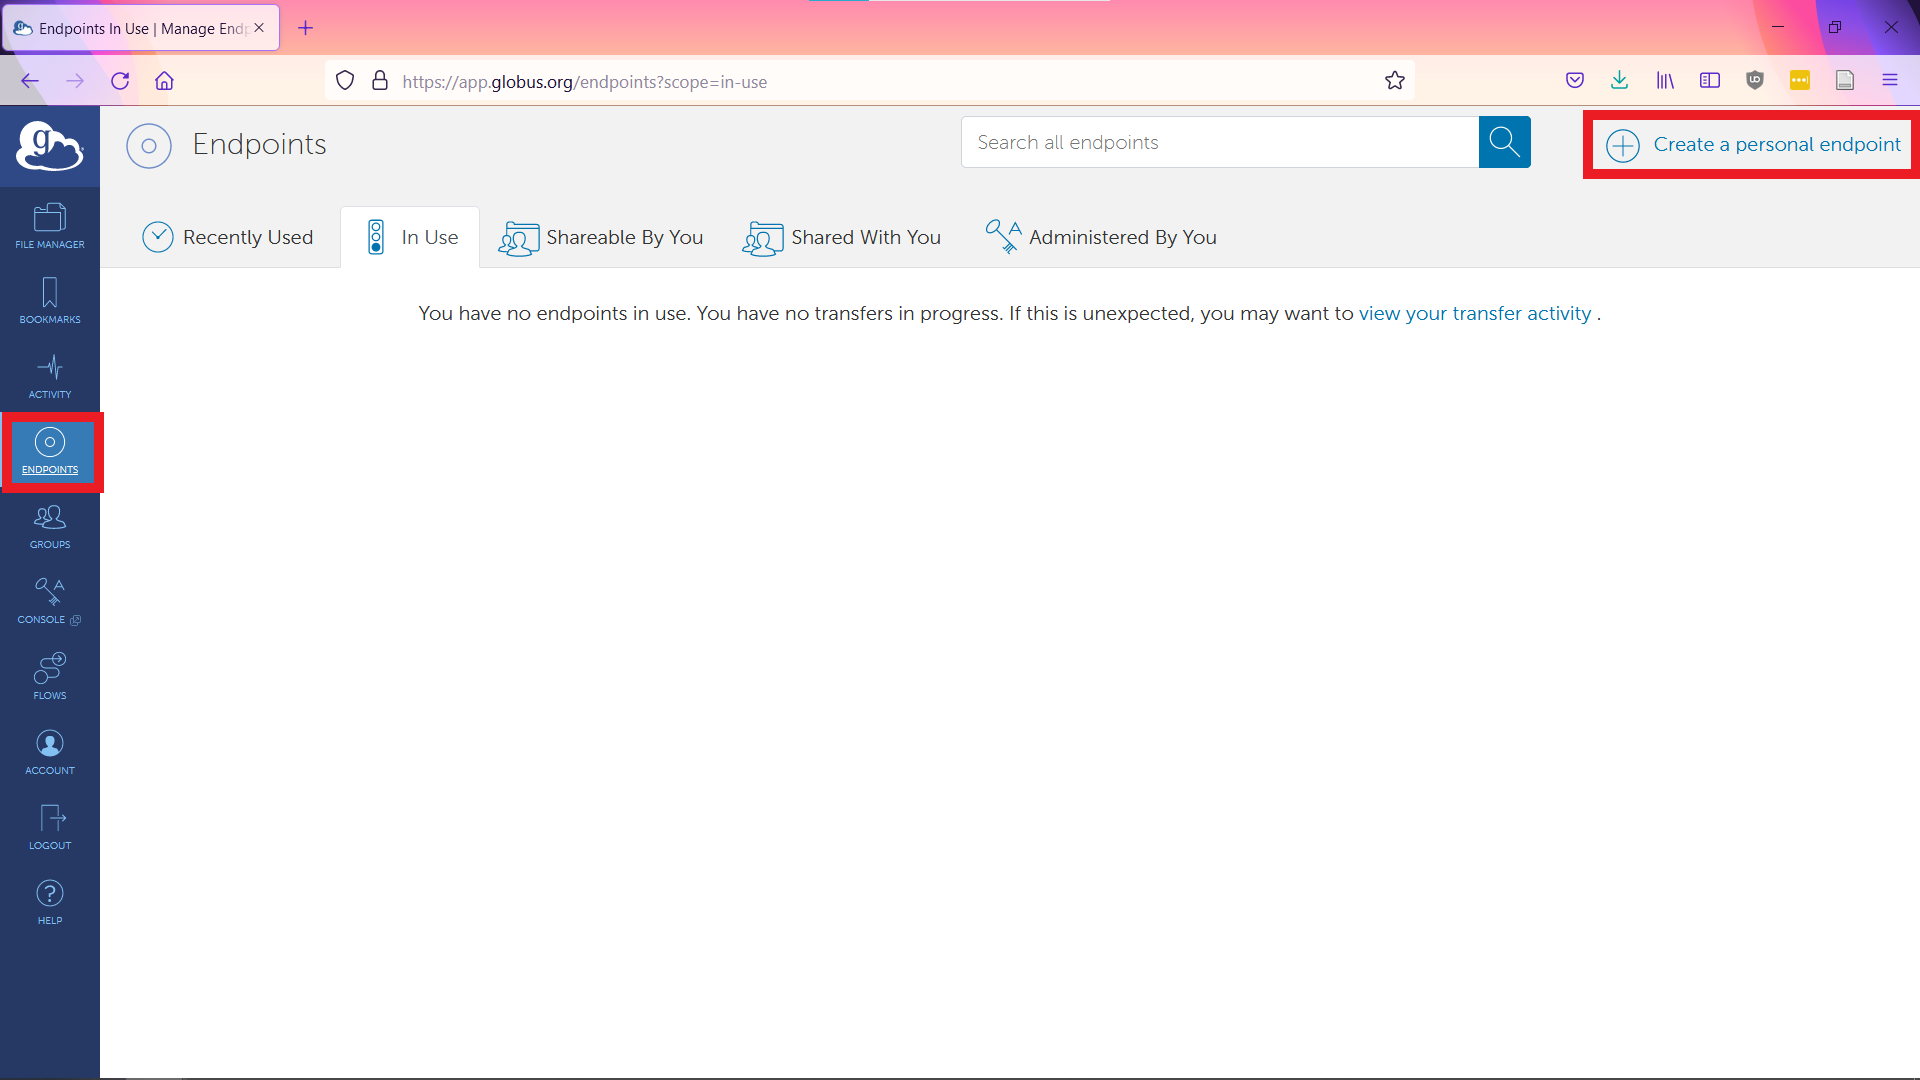
Upon successful login you, you will be directed to the "File Manager" landing page.

Click on "Endpoints" in the left-hand menu, then click “Create a personal endpoint”.
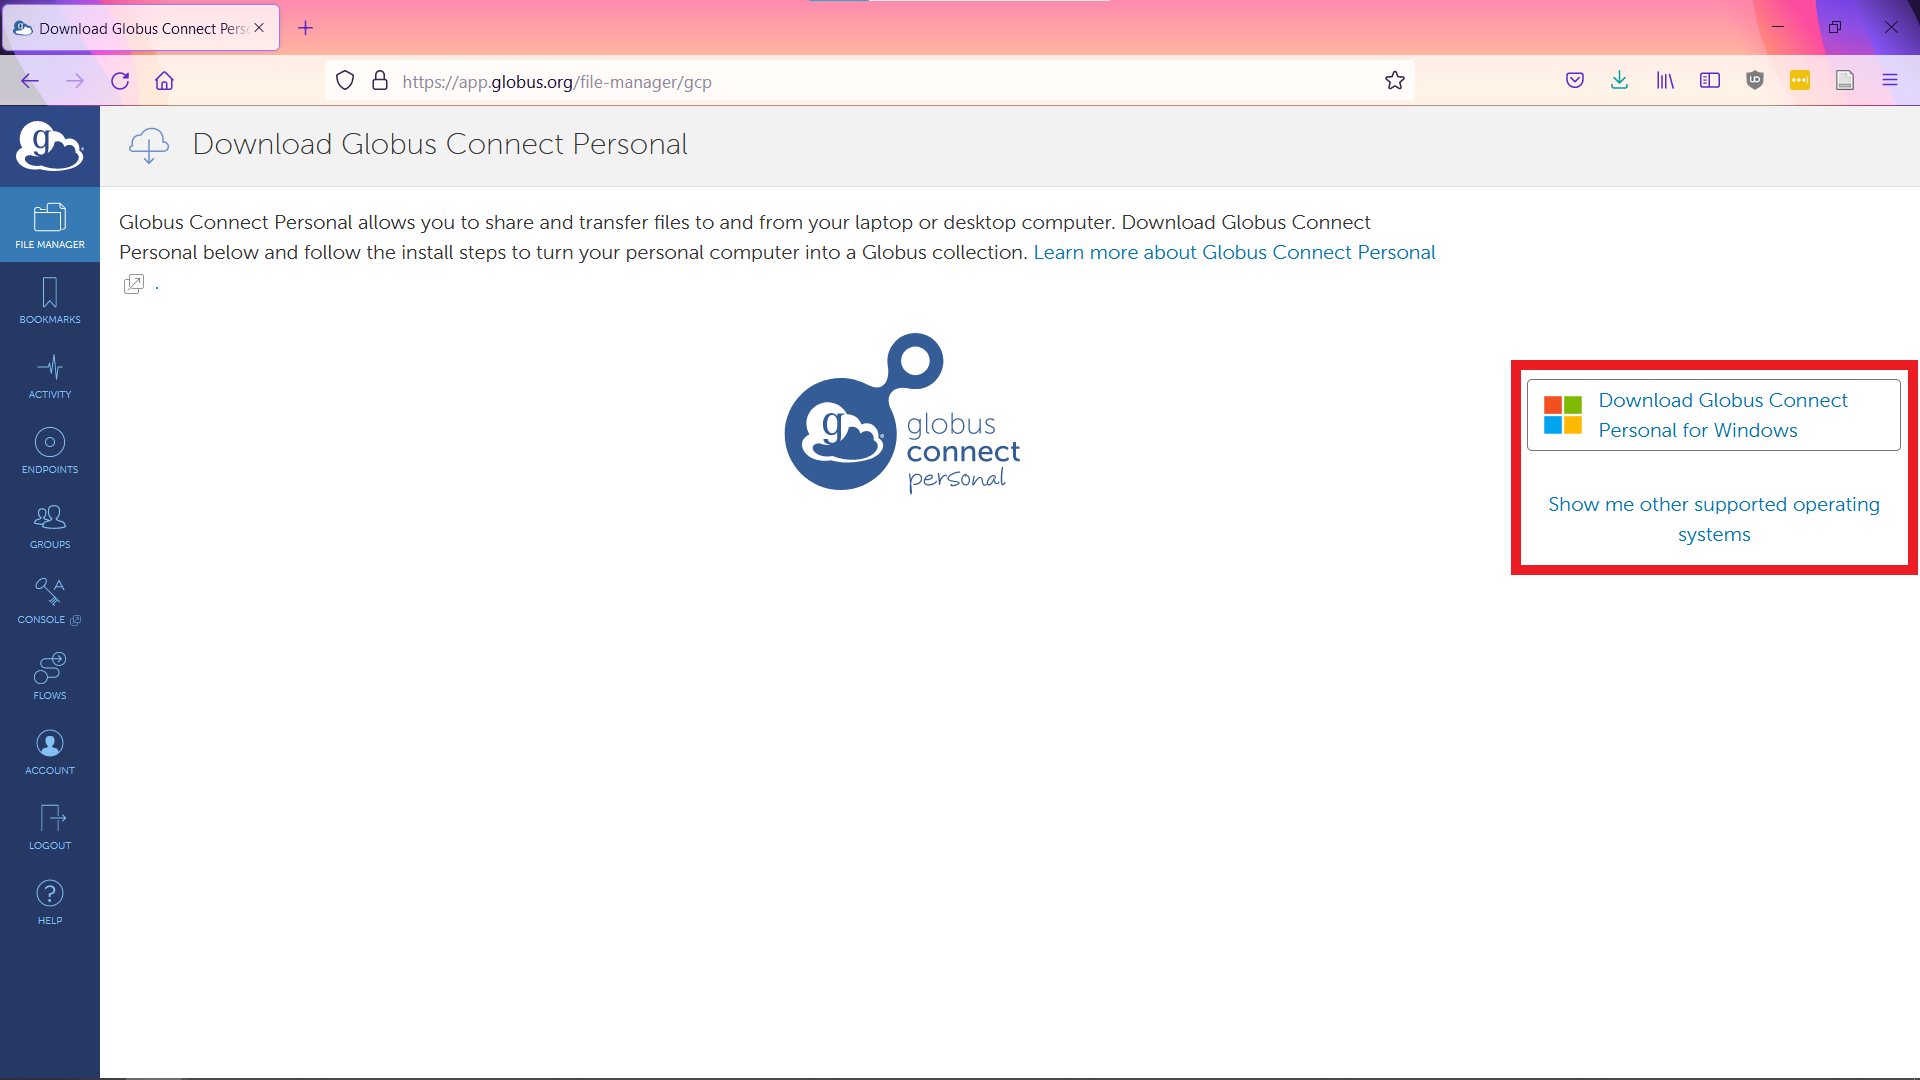
If you are using Windows click "Download Globus Connect Personal for Windows" in the upper right, otherwise click "Show me other supported operating systems" and select the one appropriate for your desktop/laptop.
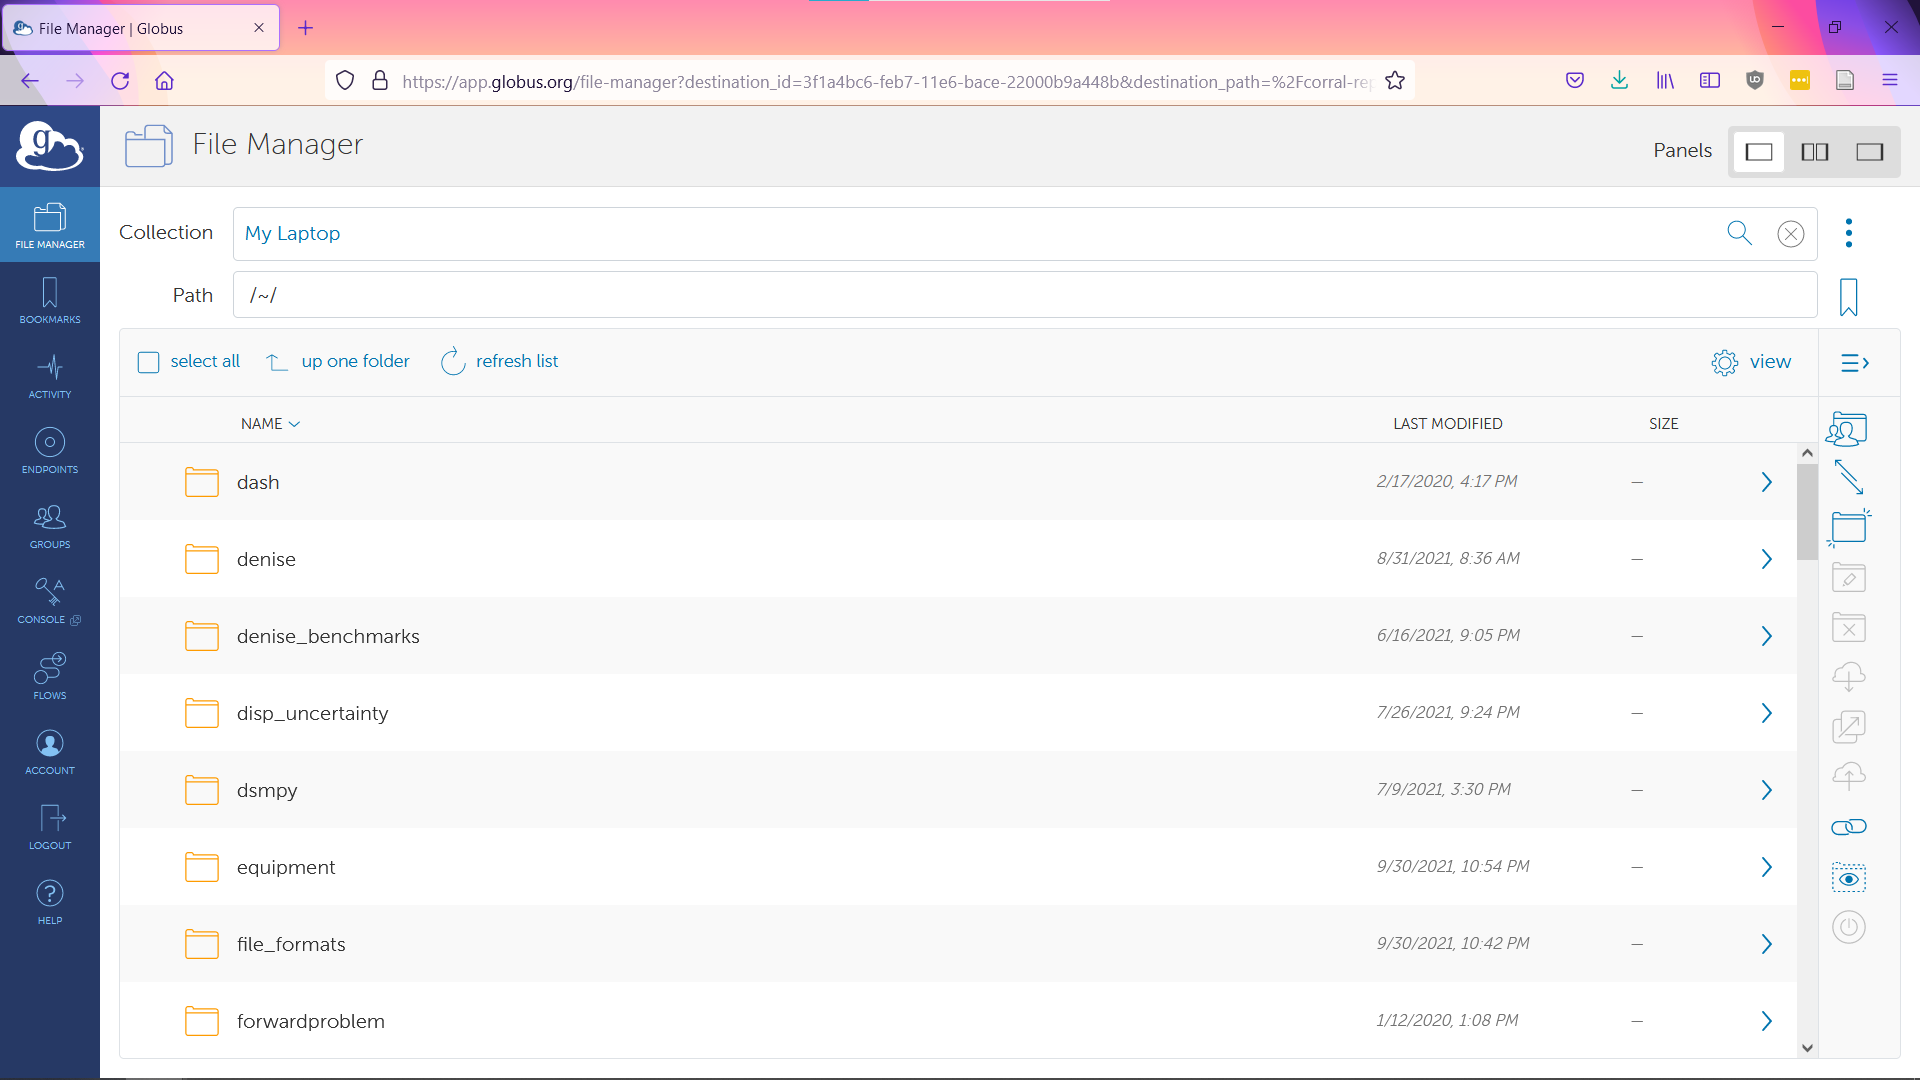
Download and Install the Globus Connect Personal client. When setting the "Collection Name" be sure to select a descriptive name. We will use "My Laptop" as the name of our endpoint.
After installation and setup is complete return to the Globus online interface. Select the “File Manager” tab (upper left), then click on the search bar immediately to the right of the label "Collection".
To initiate a transfer between your local desktop/laptop and DesignSafe, select "Your Collections" followed by the name of your endpoint, this is "My Laptop" for our example.

You can now access the files on your desktop/laptop via Globus.
5. Connect to the DesignSafe (TACC Corral3) Endpoint
To view both endpoint simultaneously, change the Globus' interface to the "two pane" view by toggling the buttons next to "Panels" in the upper right.
To establish the second endpoint, select the right-hand search bar and search for "TACC". Select "TACC Corral3" as your second end point.
After successfully authenticating, you will be redirected back to Globus and you will now be able to access your data on Corral, where the files for DesignSafe are stored.
Corral3 is a large (40 PB), shared data resource, as such, the data stored on DesignSafe is only a small fraction of that stored on the entire system. Therefore, Corral3 requires a complex file structure for organization.
To access your data on DesignSafe
- For My Data set Path to /data/designsafe/mydata/<username>/
- For My Projects set Path to /corral/projects/NHERI/projects/<project-uid>/
- For Published DesignSafe projects set Path to /corral/projects/NHERI/published/<PRJ-XXXX>/
- For Published (NEES) projects set Path to /corral/projects/NHERI/public/projects/<NEES-XXXX-XXXX.groups>/
For more information on path selection please see the detailed guide on Setting the Path to DesignSafe on Corral.
After entering the appropriate path to DesignSafe on Corral, you are ready to perform your file transfer.
Note: For directories you connect to frequenctly, for example My Data, you can create a bookmark for easy access using the bookmark icon immediately to the right of the "Path" bar.

6. Perform Transfer between Your Local Enpoint and the DesignSafe (TACC Corral3) Endpoint
To begin your transfer, select the file/folder you wish to move to/from DesignSafe.
Select the receiving location for the data in the other panel. You can do this by either typing the desired path or clicking through the directory structure.
Press the "Start" button to begin the transfer.
Once the transfer is initiated, you can view the state of the transfer by clicking "Activity".
You do not need to keep the Globus interface open through the duration of the transfer.
Globus will email you when the transfer is complete.
Globus CLI Automated Transfer Guide
Globus provides a command line interface (CLI), for those who need to perform automated data transfers. This data transfer method will likely be of most use to NHERI centers that need to bulk upload their data on a schedule.
1. Follow the steps 1-3 above in Globus Data Transfer Guide
To set up your Globus access, follow steps 1-3 above in the Globus Data Transfer Guide .
2. Activate Your Desktop/Laptop as a Globus Endpoint and Connect
If the data you wish to transfer is located on your local machine, follow Step 4 of the Globus Data Transfer Guide to create a personal endpoint.
If the data you wish to transfer is located on a server operated by your organization and does not already have a Globus Endpoint available, talk to your system administrator about creating one.
3. Install the Globus CLI
Follow the instructions provided by Globus for installing the CLI (https://docs.globus.org/cli)
Note the recommended installation method requires a system with Python3 and the ability to run pip commands.
4. Settings for CLI Transfer
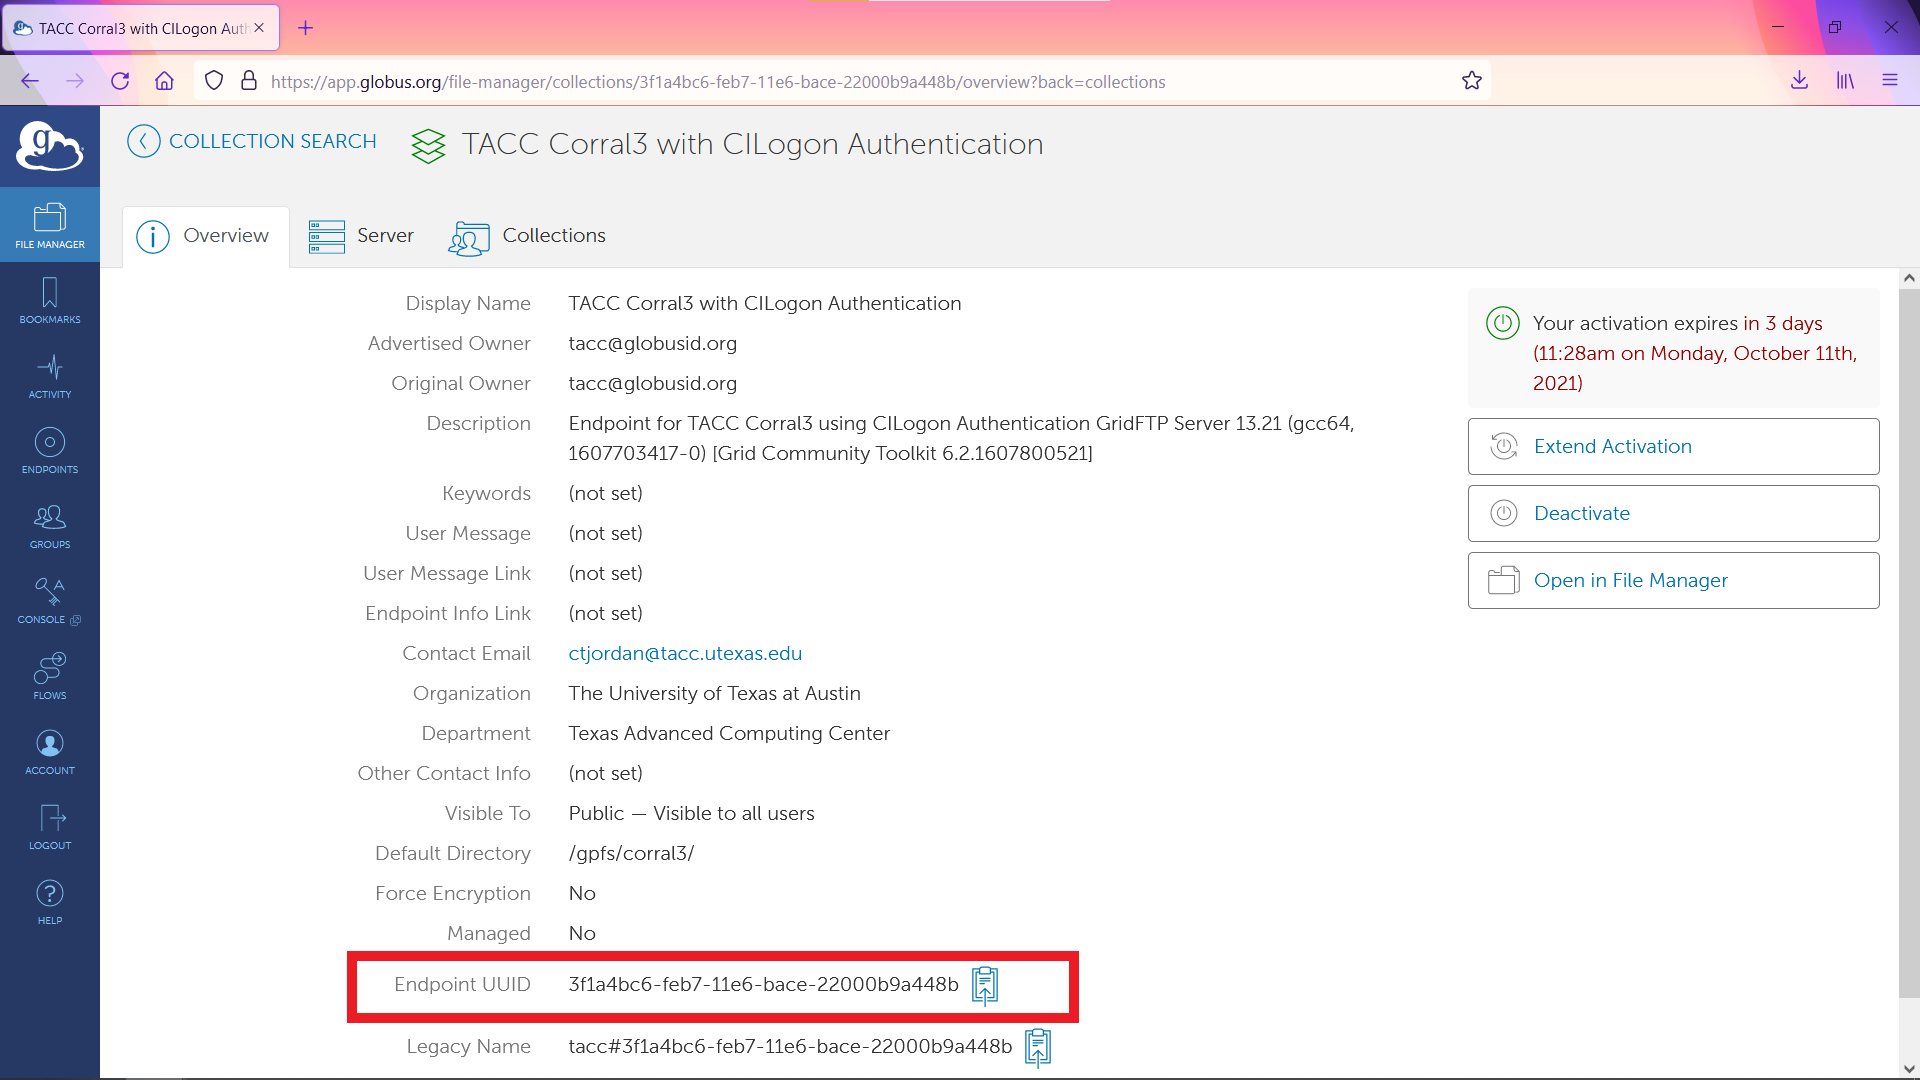
With the Globus CLI successfully installed on our local machine, we must now determine the endpoint information for DesignSafe.
Go to the Globus web interface > select the search bar.

Search for TACC Corral3 with CILogon Authentication > click the three vertical dots to the right to view endpoint details.
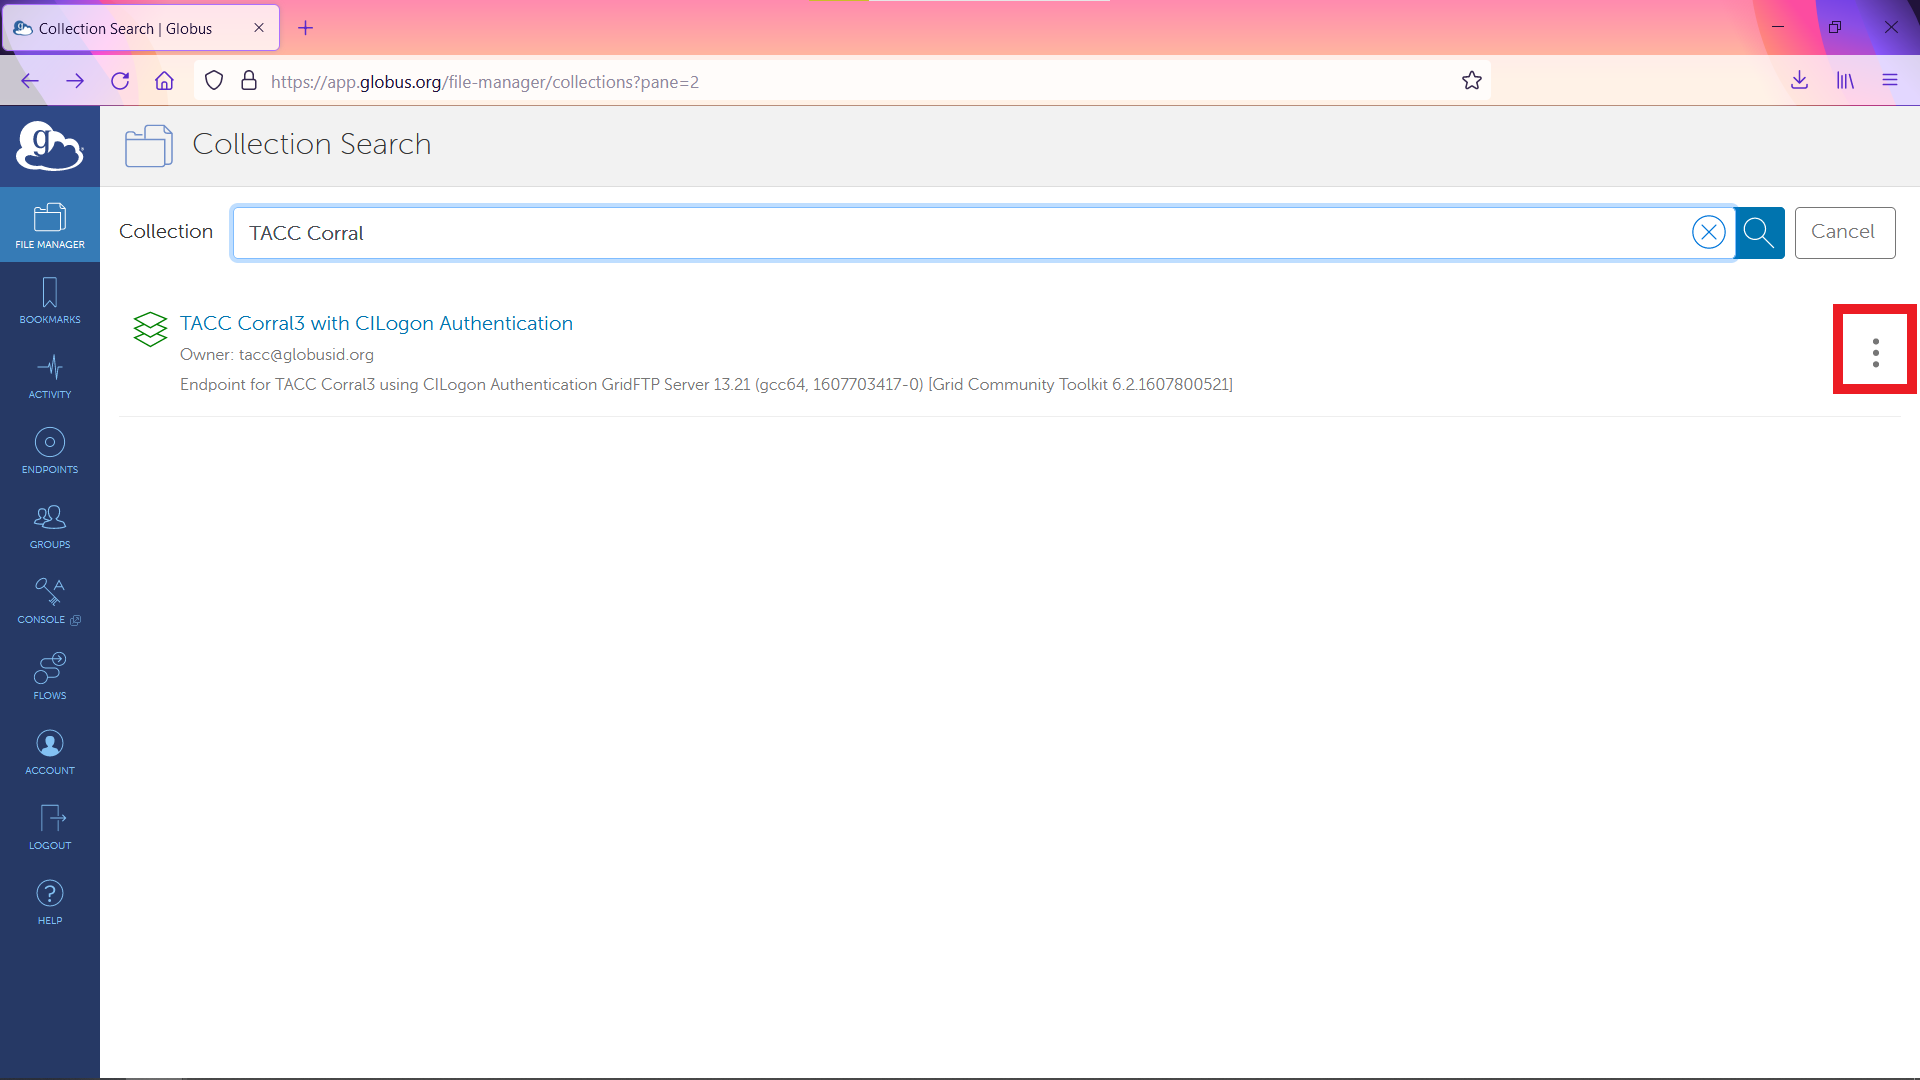
Copy the Endpoint UUID and store for later reference.
Repeat the process above to attain the UUID for your local endpoint.
5. Test Globus CLI Transfer
With the endpoint IDs, we can now do a test transfer with the Globus CLI.
Start by authenticating by entering the following:
globus login
This will prompt you to authenticate through your web-browser and grant permissions to Globus-CLI.
Next, we create our transfer command. The basic structure follows:
globus transfer [OPTIONS] SOURCE_ENDPOINT_ID[:SOURCE_PATH] DEST_ENDPOINT_ID[:DEST_PATH]
An example transfer command:
globus transfer --recursive [endpoint uuid for your machine]:[path on your machine] [endpoint uuid for tacc corral3]:[path on tacc corral3 to your My Data or Project]
Fill out the variables in the example command with the UUIDs and paths and submit the transfer. If you are unsure of the appropriate Corral3 path, please refer to the guide on Setting the Path to DesignSafe on Corral for more information.
You will get a message stating whether your transfer was successful or not. If it was successful, you will receive the message:
Message: The transfer has been accepted and a task has been created and queued for executionTask ID: [taskid]
The full reference for the Globus CLI can found here: https://docs.globus.org/cli/reference.
The full reference for the transfer command, including information on additional options that may be useful to you, can be found here: https://docs.globus.org/cli/reference/transfer.
6. Create an Automatic Transfer Script
We will now create a shell script to store the transfer details (i.e., UUIDs and paths) and globus-cli syntax to allow us to quickly and reliably initiate future transfers.
Below is an example script you can modify for your transfers. Note that this does hard code the UUIDs and paths and therefore assumes you are always transferring to and from the same locations.
#!/bin/bash

GLOBUS_CLI_INSTALL_DIR="$(python -c 'import site; print(site.USER_BASE)')/bin"

export PATH="$GLOBUS_CLI_INSTALL_DIR:$PATH"

# Globus endpoints
epid1 = ENTER_YOUR_GLOBUS_CONNECT_ENDPOINT_ID
epid2 = ENTER_THE_TACC_CORRAL_ENDPOINT_ID

# Data paths
local_path = PATH_TO_YOUR_DATA_ON_LOCAL_MACHINE
remote_path = PATH_TO_YOUR_DATA_ON_CORRAL3

# End points
ep1 = $epid1:$local_path
ep1 = $epid2:$remote_path

# Time stamped label for transfer
label=$(data + "%Y&m&d_%H%M%S")
label=$"YourLabelHere_${label}"

# Run transfer
globus transfer --recursive --label $label "$ep1" "$ep2"
7. Automate Script Execution with cron
To automate the transfer we wil use the Linux scheduling utility cron to call our transfer script on a specified schedule.
An example cron table entry that you can use to automatically run your transfer every six hours is listed below:
0 /6 * * /location/of/your/globustransfer.sh > /dev/null
Cyberduck Data Transfer Guide
Cyberduck is an open-source SSH File Transfer Protocal (sftp) client that allows you to securely connect from your laptop to DesignSafe and other Texas Advanced Computing Center (TACC) resources.
1. Set up MFA using the TACC Token App
TACC requires multi-factor authentication (MFA) for logging directly into our resources. Go to the TACC user portal and log in with your DesignSafe/TACC credentials, click on Manage Account on the left menu, and then pair a device with your account. If needed you can explore the full MFA instructions.
2. Download and Install Cyberduck
Download Cyberduck and install.
Note that Cyberduck is Free Software and as such is freely available to download (see link above). However, some approaches to downloading Cyberduck (such as through the Windows Store and Mac App Store) come with a registration key that disables a donation prompt. While you may purchase a registration key to support the development of Cyberduck if you wish, the activation key is not required to use the software for transfer files to and from DesignSafe.
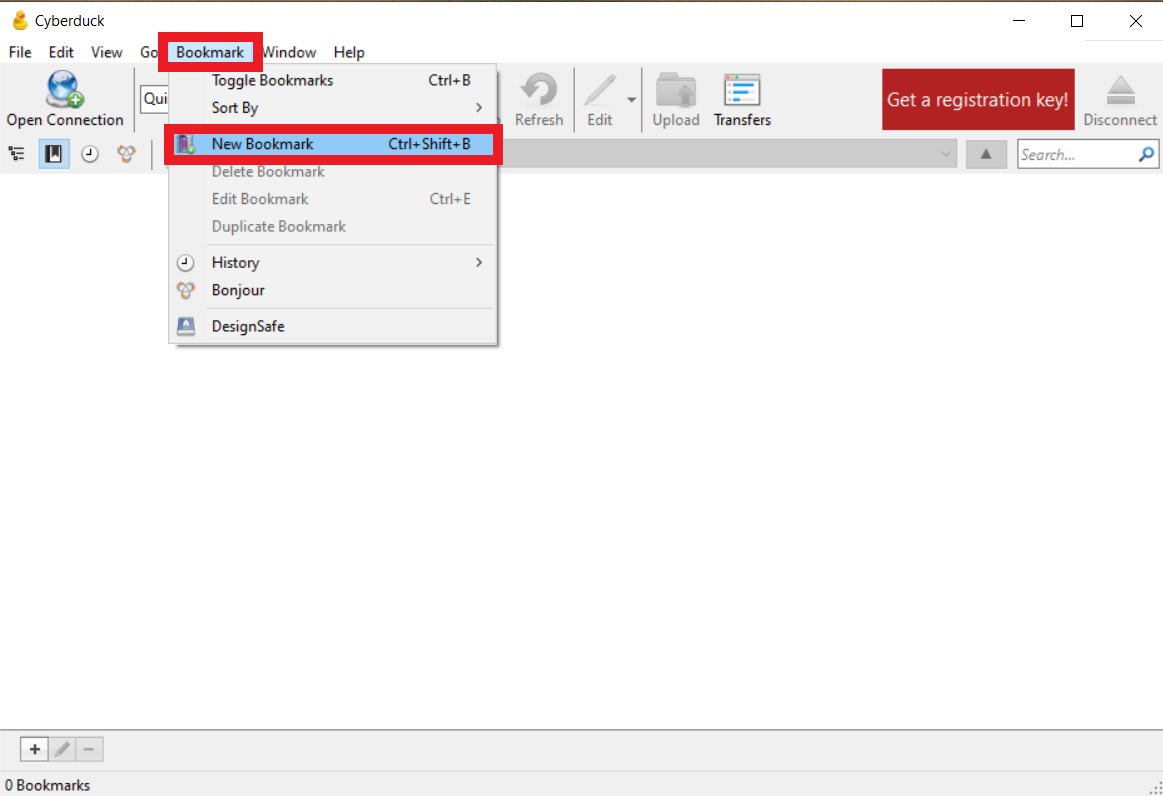
3. Create a New Bookmark
Launch the Cyberduck app and select "Bookmark" > "New Bookmark".
4. Populate Bookmark
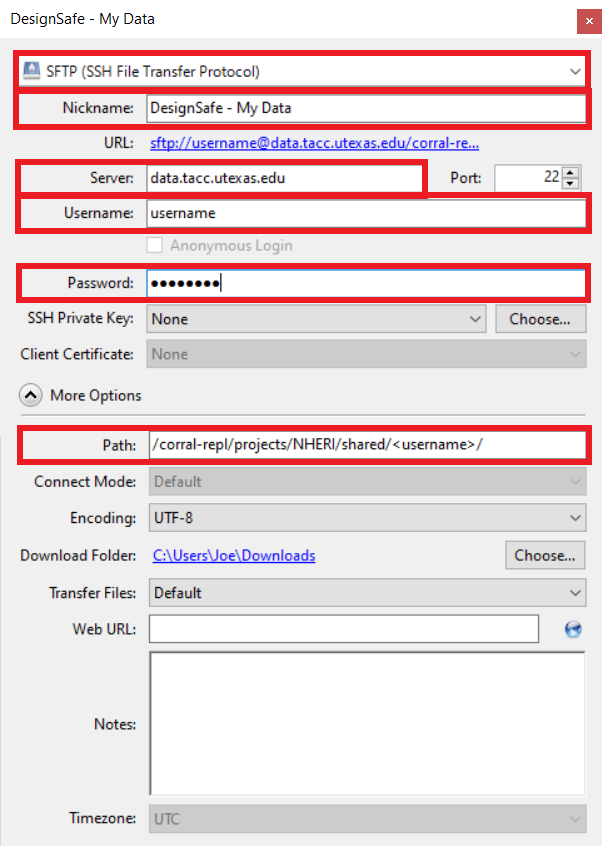
Change the top dropdown to "SFTP (SSH File Transfer Protocol)".
Provide a descriptive nickname to the connection, for example "DesignSafe - Data Depot".
Set "Server" to "data.tacc.utexas.edu".
Enter your DesignSafe/TACC username and password.
For the "Path", refer to Setting Path to DS on Corral.
If you do not see the "Path" option click the button "More Options" in the lower left.
When complete your bookmark should look similar to the example provided below.
When done close the bookmark. You will now see your newly created bookmark in the main Cyberduck window.
5. Perform Transfer
Right-click on your newly created bookmark and select "Connect to Server". You will be prompted for your TACC Token code. Input the code from your TACC Token app.
After you are connected, you will see the directory you selected for your path.
To upload files, in the top menu, click "File" > "Upload". You will be prompted to select files from your machine to upload. You will get a prompt for your TACC Token code. You will see a "Transfers" window that shows the status of your transfer.
To download files, select the file(s) you wish to download. Select "File" > "Download". You will get a prompt for your TACC Token code. You will see a "Transfers" window that shows the status of your transfer.
Command-Line Data Transfer Guide
Common command-line utilities, such as scp and rsync, may also be used to transfer large amounts of data to DesignSafe. Command line tools require the shortest setup time (assuming you have a compatible terminal), however are generally found challenging for first-time users as you will need to learn unix commands. Therefore, command line transfers are only recommended in specific circumstances where other tools have been tried and found to be insufficient.
1. Set up MFA using the TACC Token App
TACC requires multi-factor authentication (MFA) for logging directly into our resources. Go to the TACC user portal and log in with your DesignSafe/TACC credentials, click on Manage Account on the left menu, and then pair a device with your account. If needed you can explore the full MFA instructions.
2. Select Transfer Utility and Perform Transfer
There are several different command-line based file transfer utilities. We detail two of them here: scp and rsync.
scp
A data transfer can be performed using the secure copy (scp) utility between any Linux, Mac, or Windows (with Window's Subsystem for Linux) machine and DesignSafe.
A file can be copied from your local system to the remote server by using the command:
where <filename> is the name of the file you wish to copy, <username> is your DesignSafe/TACC username, and </path/to/directory> is the path on Corral where you wish to send the copy of your file. For the "Path", refer to Setting Path to DS on Corral.
An entire folder can be copied from your local system to the remote server by using the command:
scp -r </path/to/folder/> <username>@data.tacc.utexas.edu:</path/to/project/directory/>
where the -r indicates the copy should be recursive, </path/to/folder/>is the name of the folder you wish to copy (be sure to include the final "/", and all other terms defined previously.
For help execute:
scp -h
For more information execute:
man scp
rsync
A data transfer can also be performed using the rsync utility between any Linux, Mac, or Windows (with Window's Subsystem for Linux) machine and DesignSafe. The rsync utility is different from the scp utility as it first compares the source and destination files prior to performing the transfer and only performs a data transfer on the file(s) if they are different.
A file can be synced from your local system to the remote server by using the command:
<em><strong>rsync <filename> <username>@data.tacc.utexas.edu:</path/to/project/directory/></strong></em>
where <filename> is the name of the file you wish to copy, <username> is your DesignSafe/TACC username, and </path/to/directory/> is the path on Corral where you wish to send the copy of your file. For the "Path", refer to Setting Path to DS on Corral.
An entire directory can be synced from your local system to the remote server by using the command:
<em><strong>rsync -avtr </path/to/folder/> <username>@data.tacc.utexas.edu:</path/to/project/directory></strong></em>
where -avtr will transfer the files recursively -r, with the modification times -t, in the archive mode -a, and verbosely -v and all other terms defined previously.
For help execute:
rsync -h
For more information execute:
man rsync
Data Depot's Browser-Based Data Transfer Guide
The Data Depot's browser interface allows you to conveniently upload and download small quantities of data (< 100 MB, < 25 files, < 2 folders) as well as move and copy data between directories.
Upload
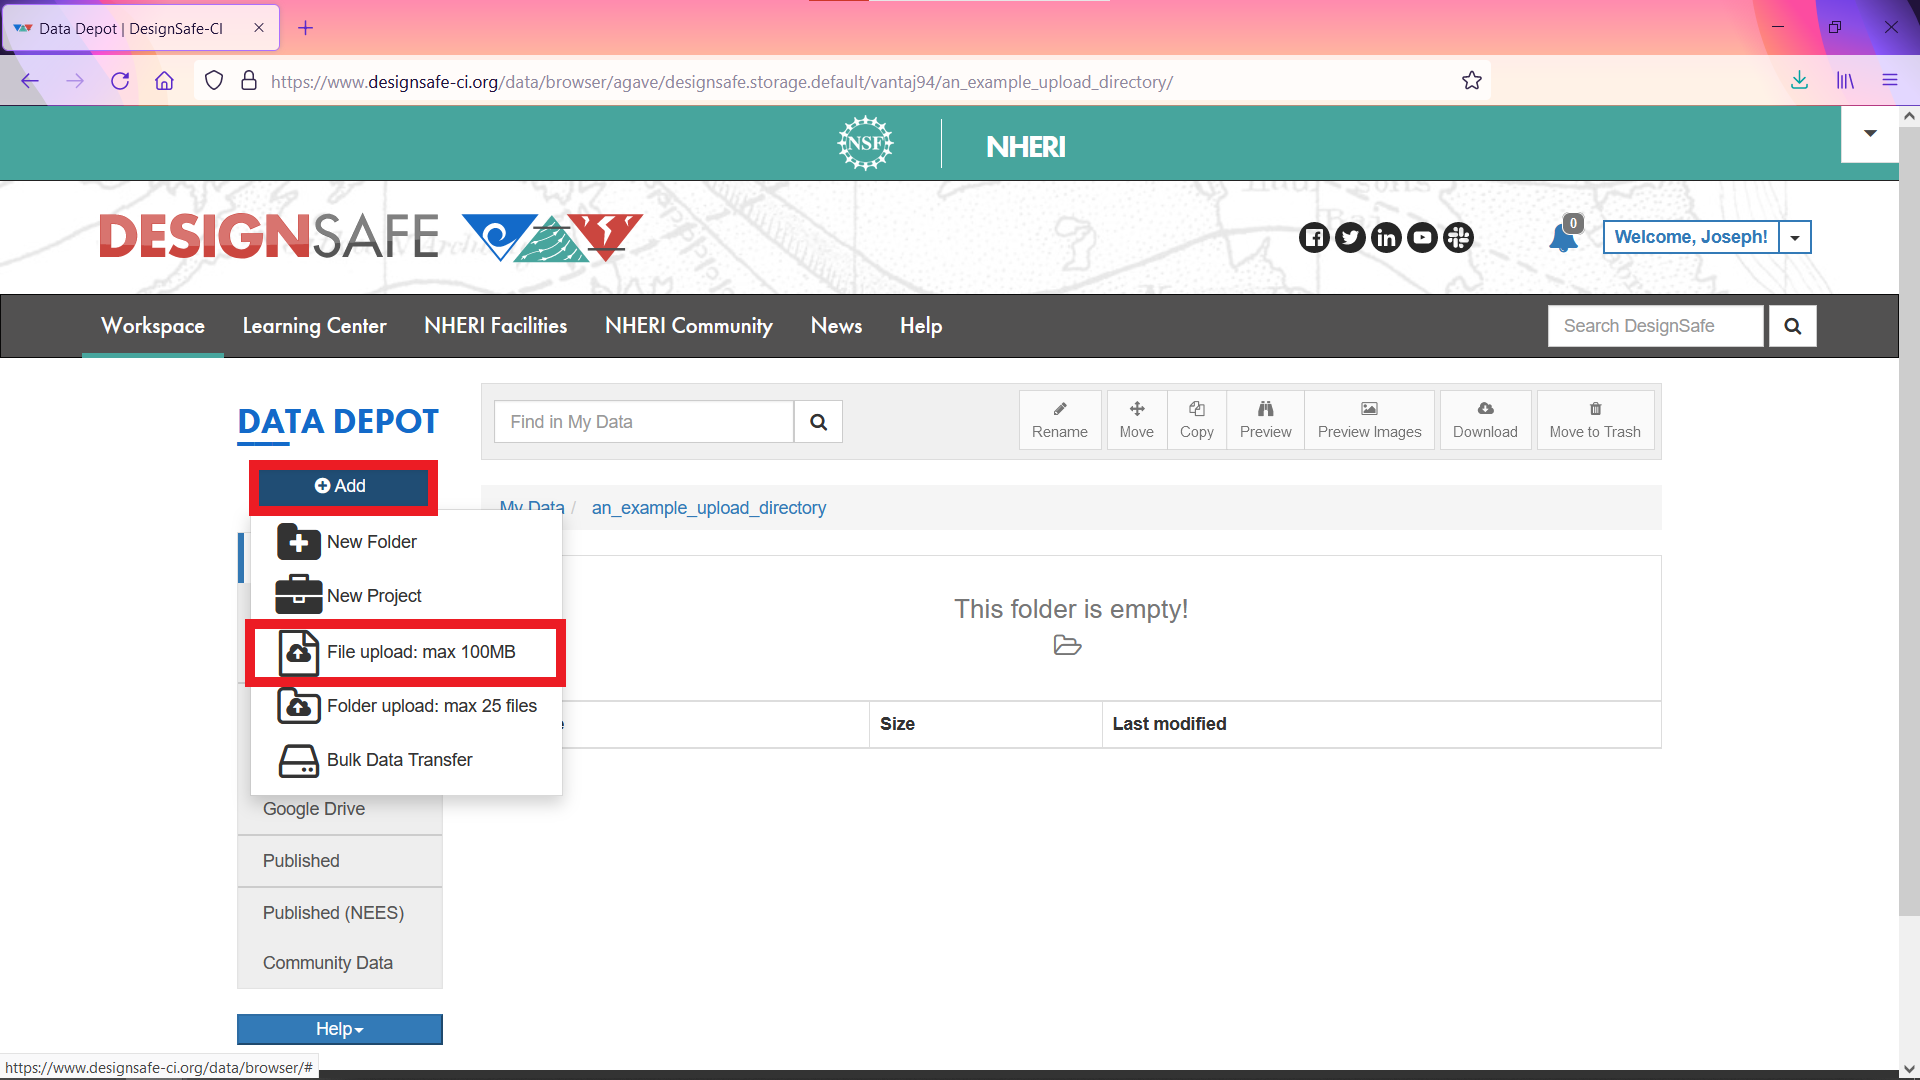
To upload a small amount of data through your browser login to DesignSafe and go to My Data.
Open the DesignSafe directory where you wish to uploaded your data. Here we upload to "an_example_upload_directory".
Select + Add then File Upload: max 100 MB.
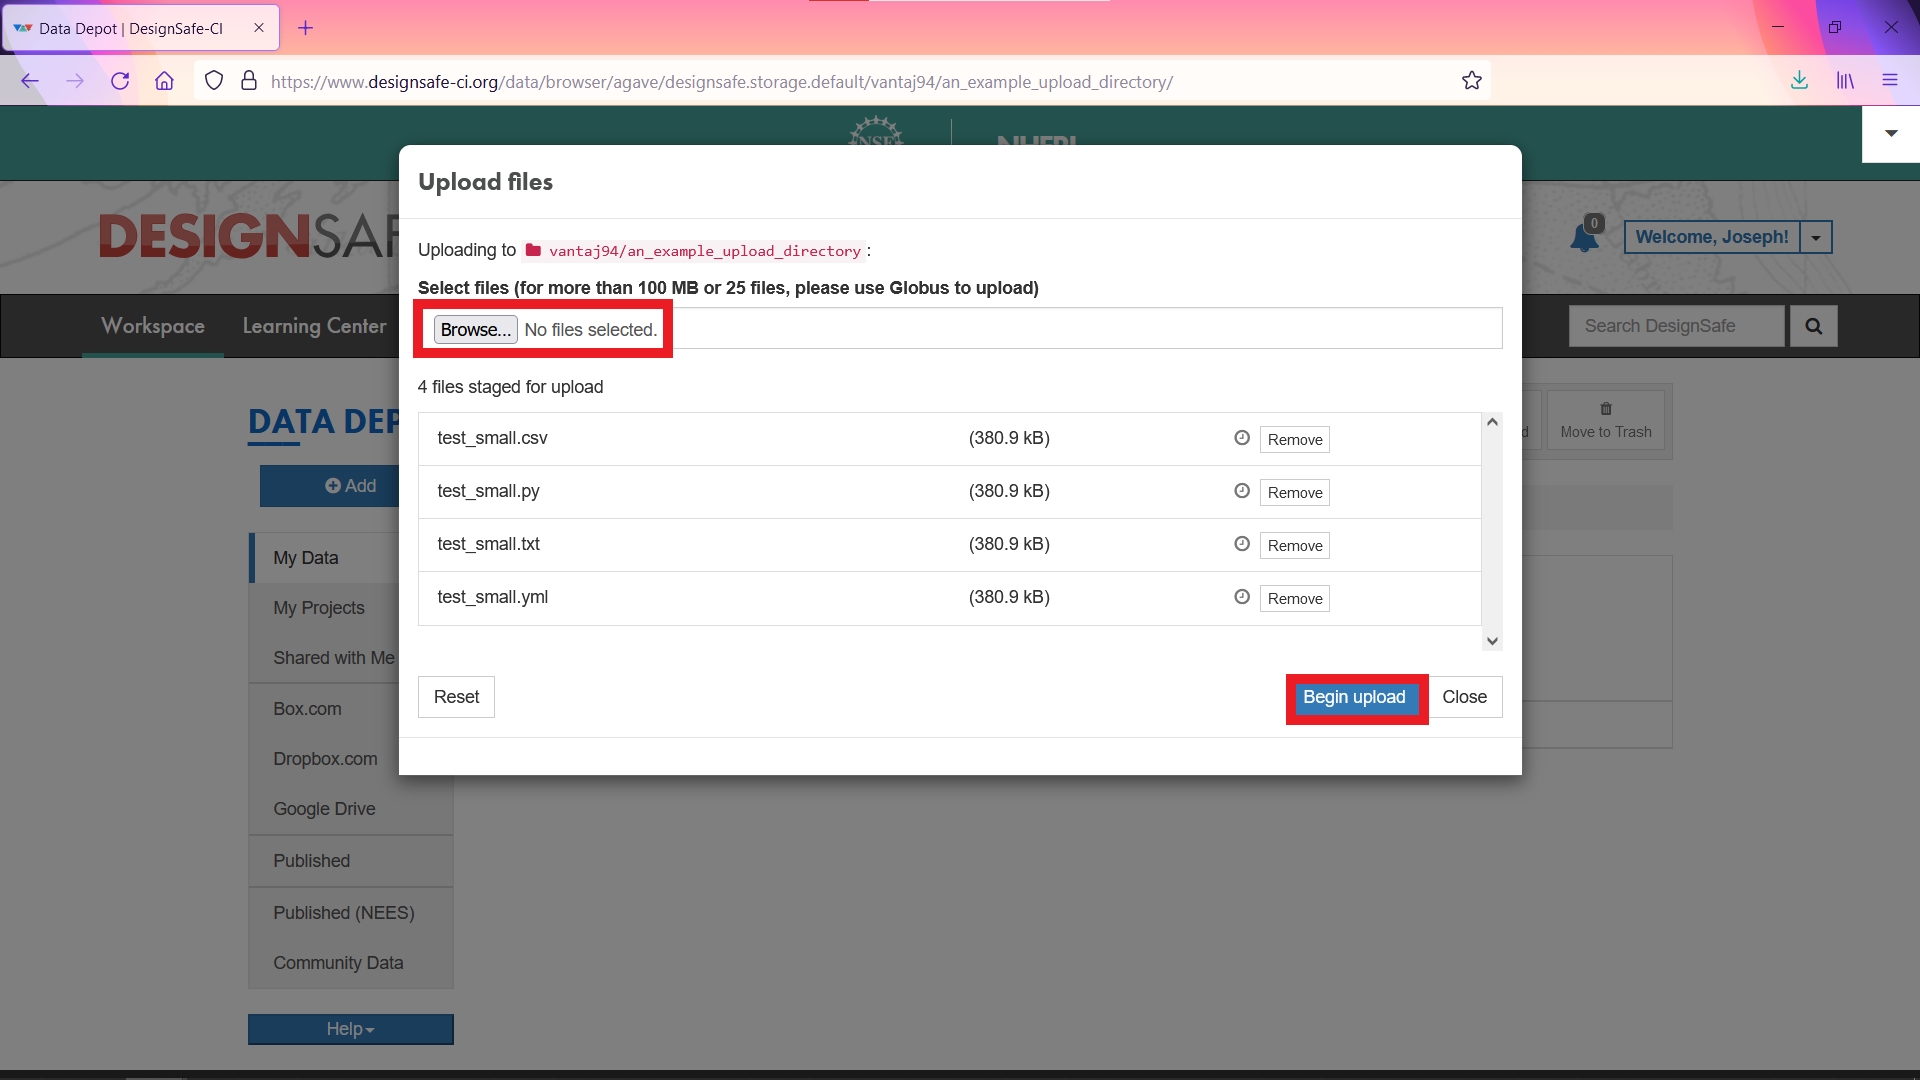
Select Browse... at the top to select the files you wish to upload. Press Begin upload to initiate the transfer.
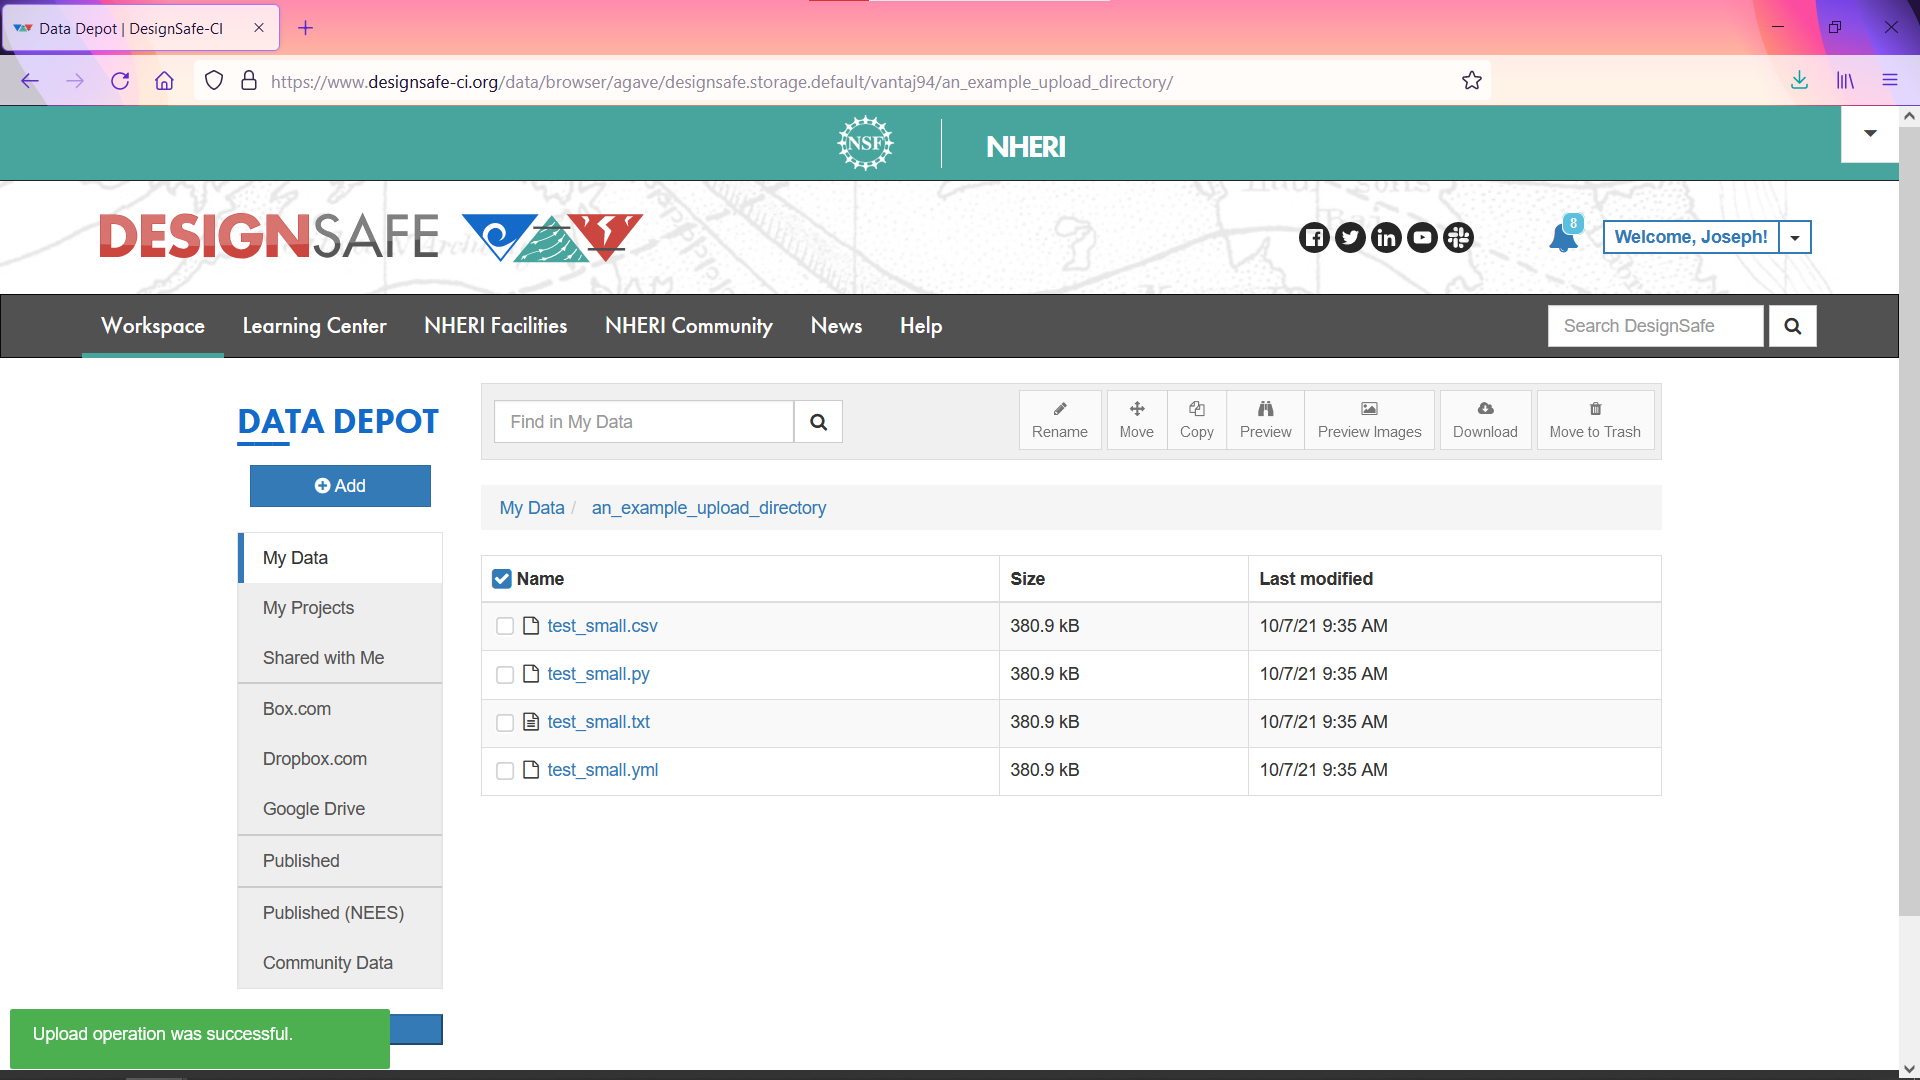
Once the transfer is complete the Upload files window will close and you will see your files in your DesignSafe directory.
Note, if the files are not immediately visible refresh the page.
If you wish to upload a folder, follow the same procedure as above except select Folder upload: max 25 files. However, be sure that the folder you wish to upload is small than 100 MB and contains fewer than 25 files. If the folder you wish to upload exceeds these limits please use one of the large data transfer methods listed in this guide rather than the web interface.
Download
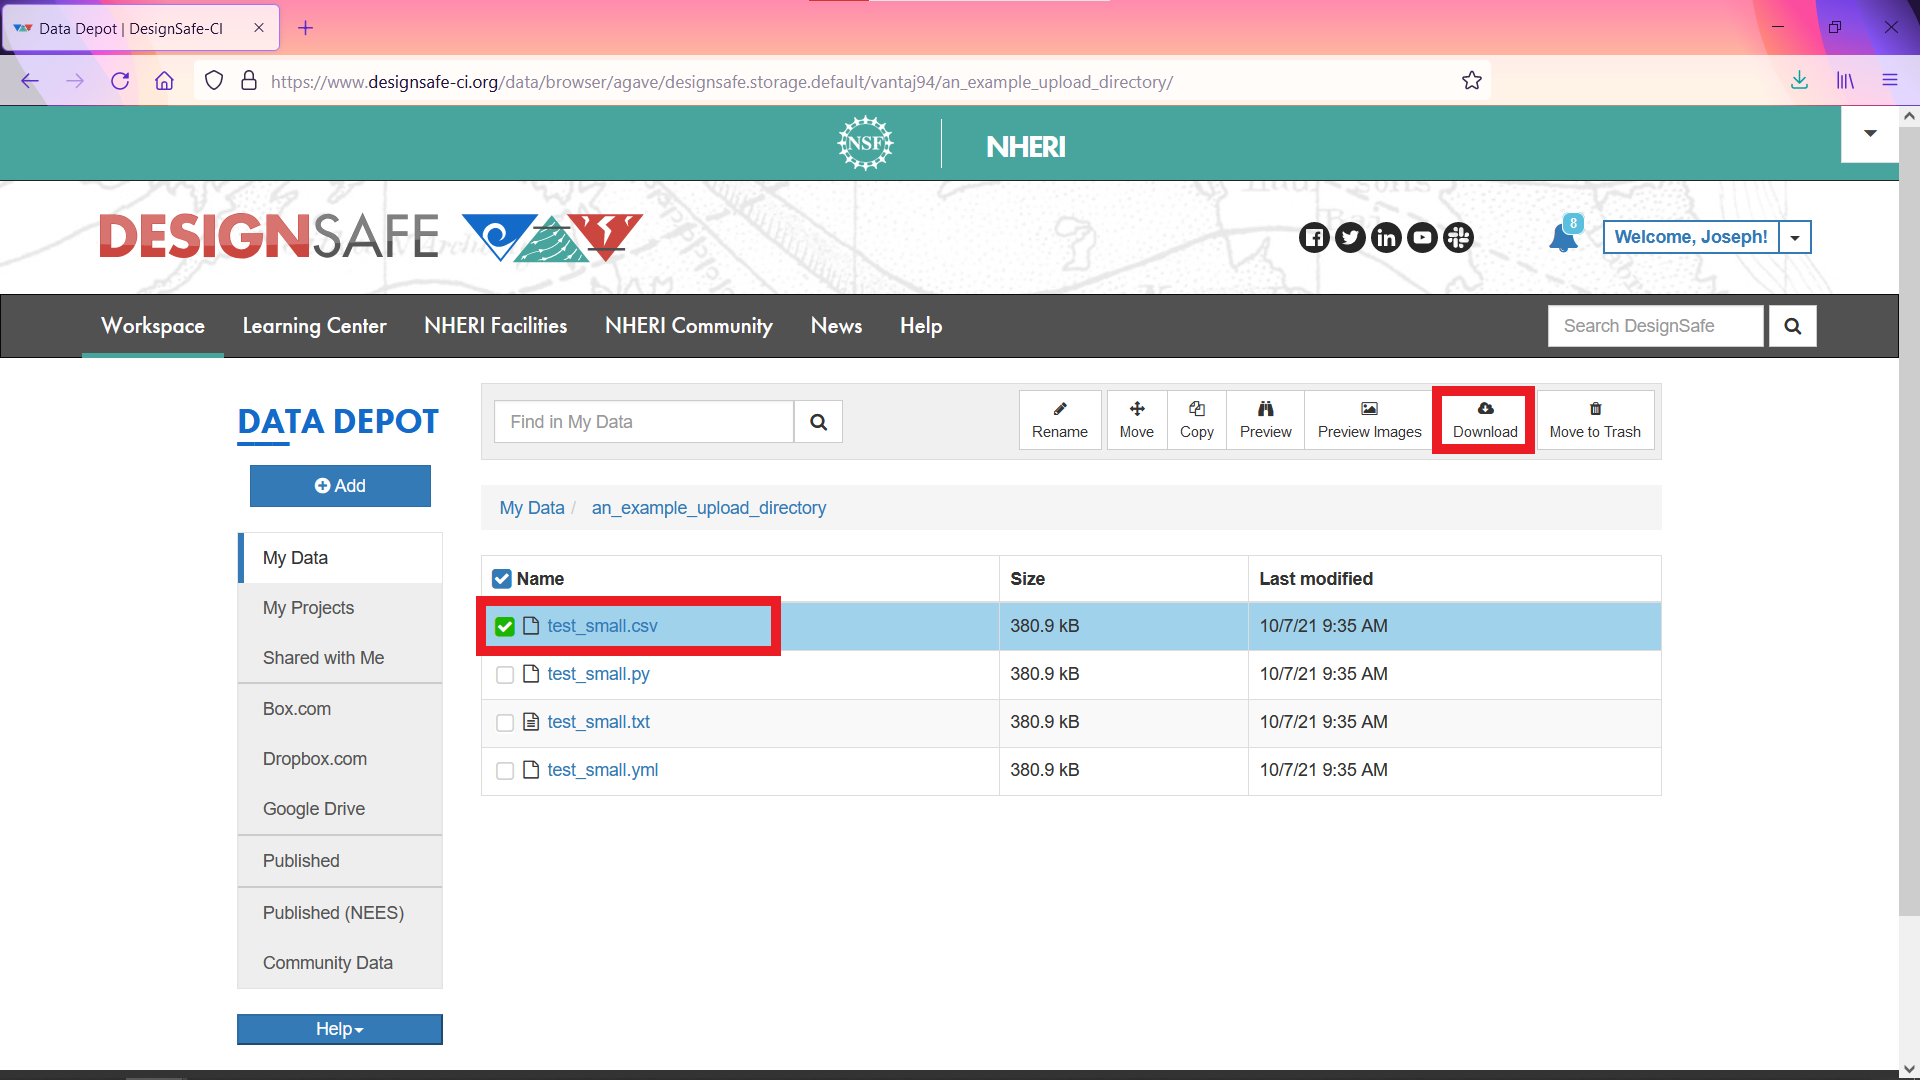
To download a file from DesignSafe to your local desktop/laptop select the file you wish to download and press Download.
Note depending on how you have configured your browser, it will either download the file directly to your default downloads directory or will prompt you to save the file in a location of your choice.
If you would like to download an entire folder from DesignSafe, please use one of the large data transfer methods listed in this guide.
Transferring Data Inside of DesignSafe
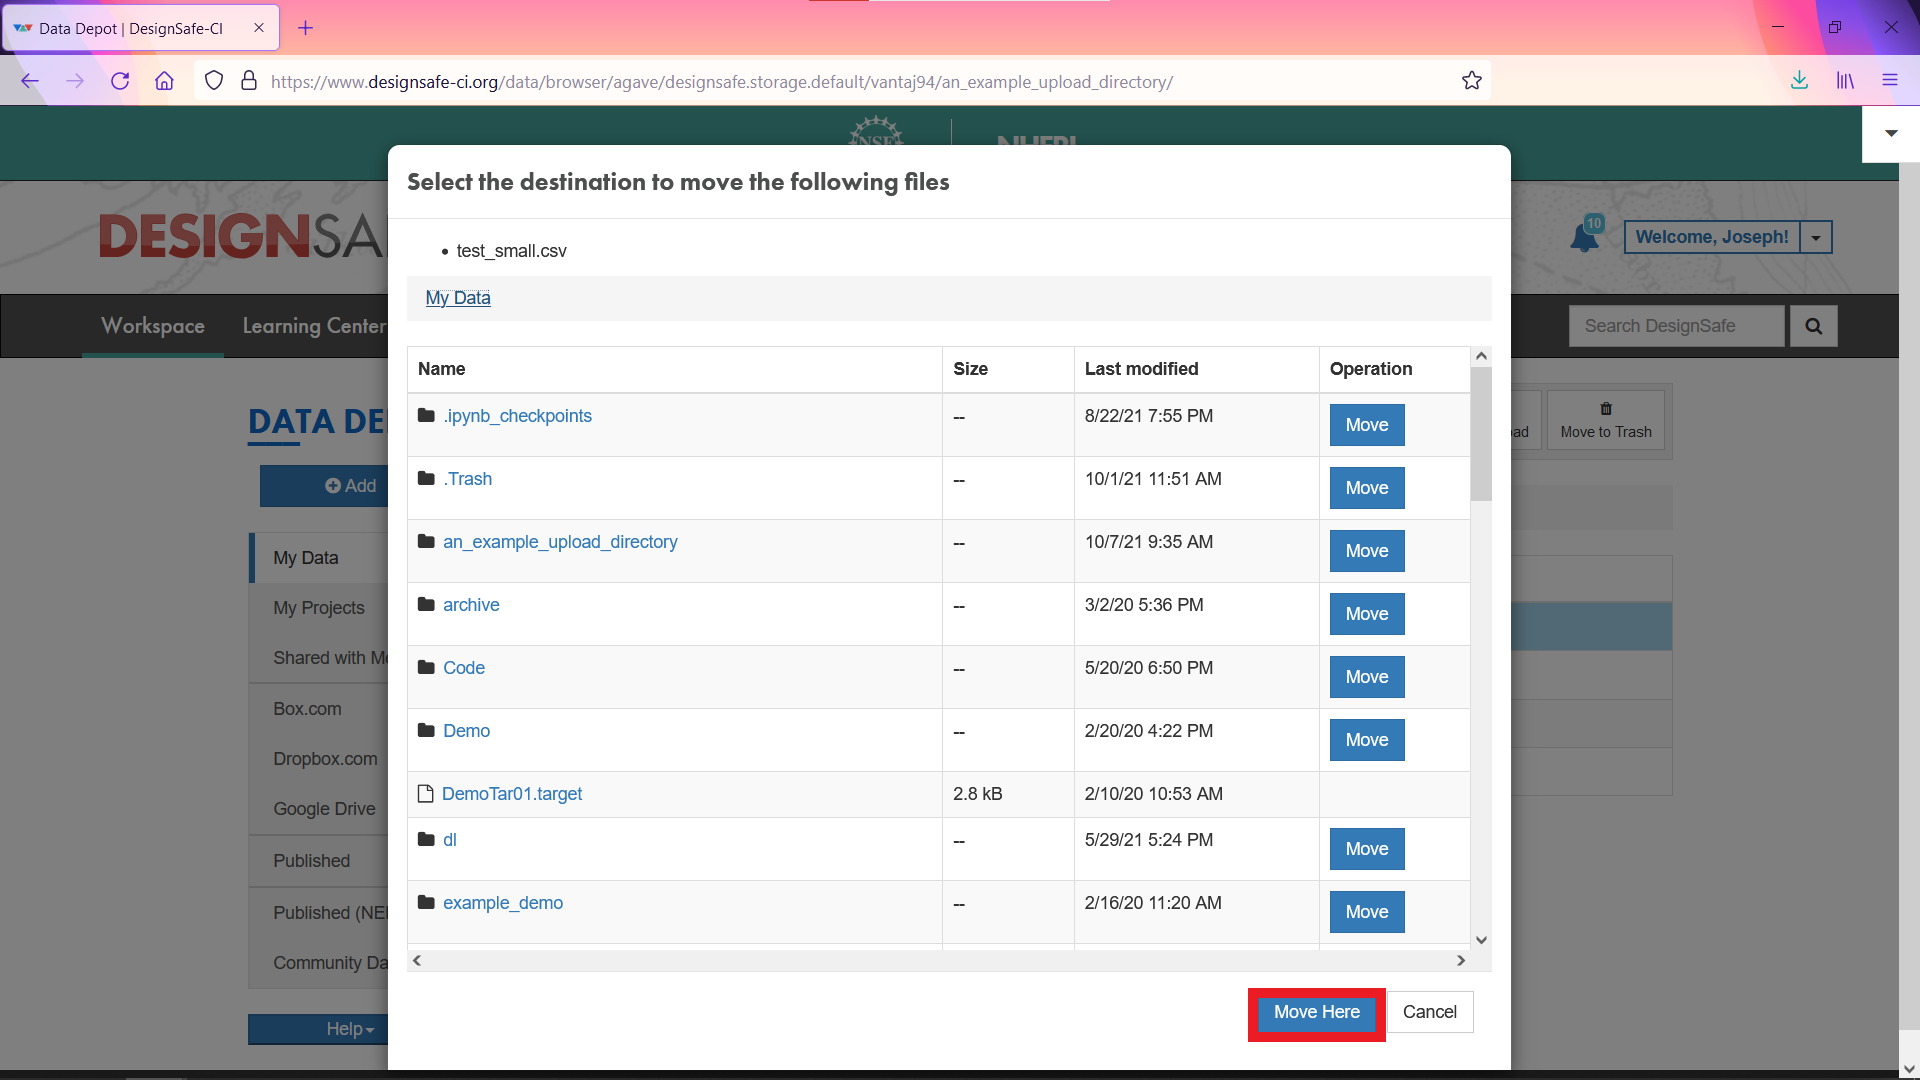
You can move and copy the data inside of DesignSafe using the browser-based interface.
Select the file you wish to move or copy, then press Move or Copy.
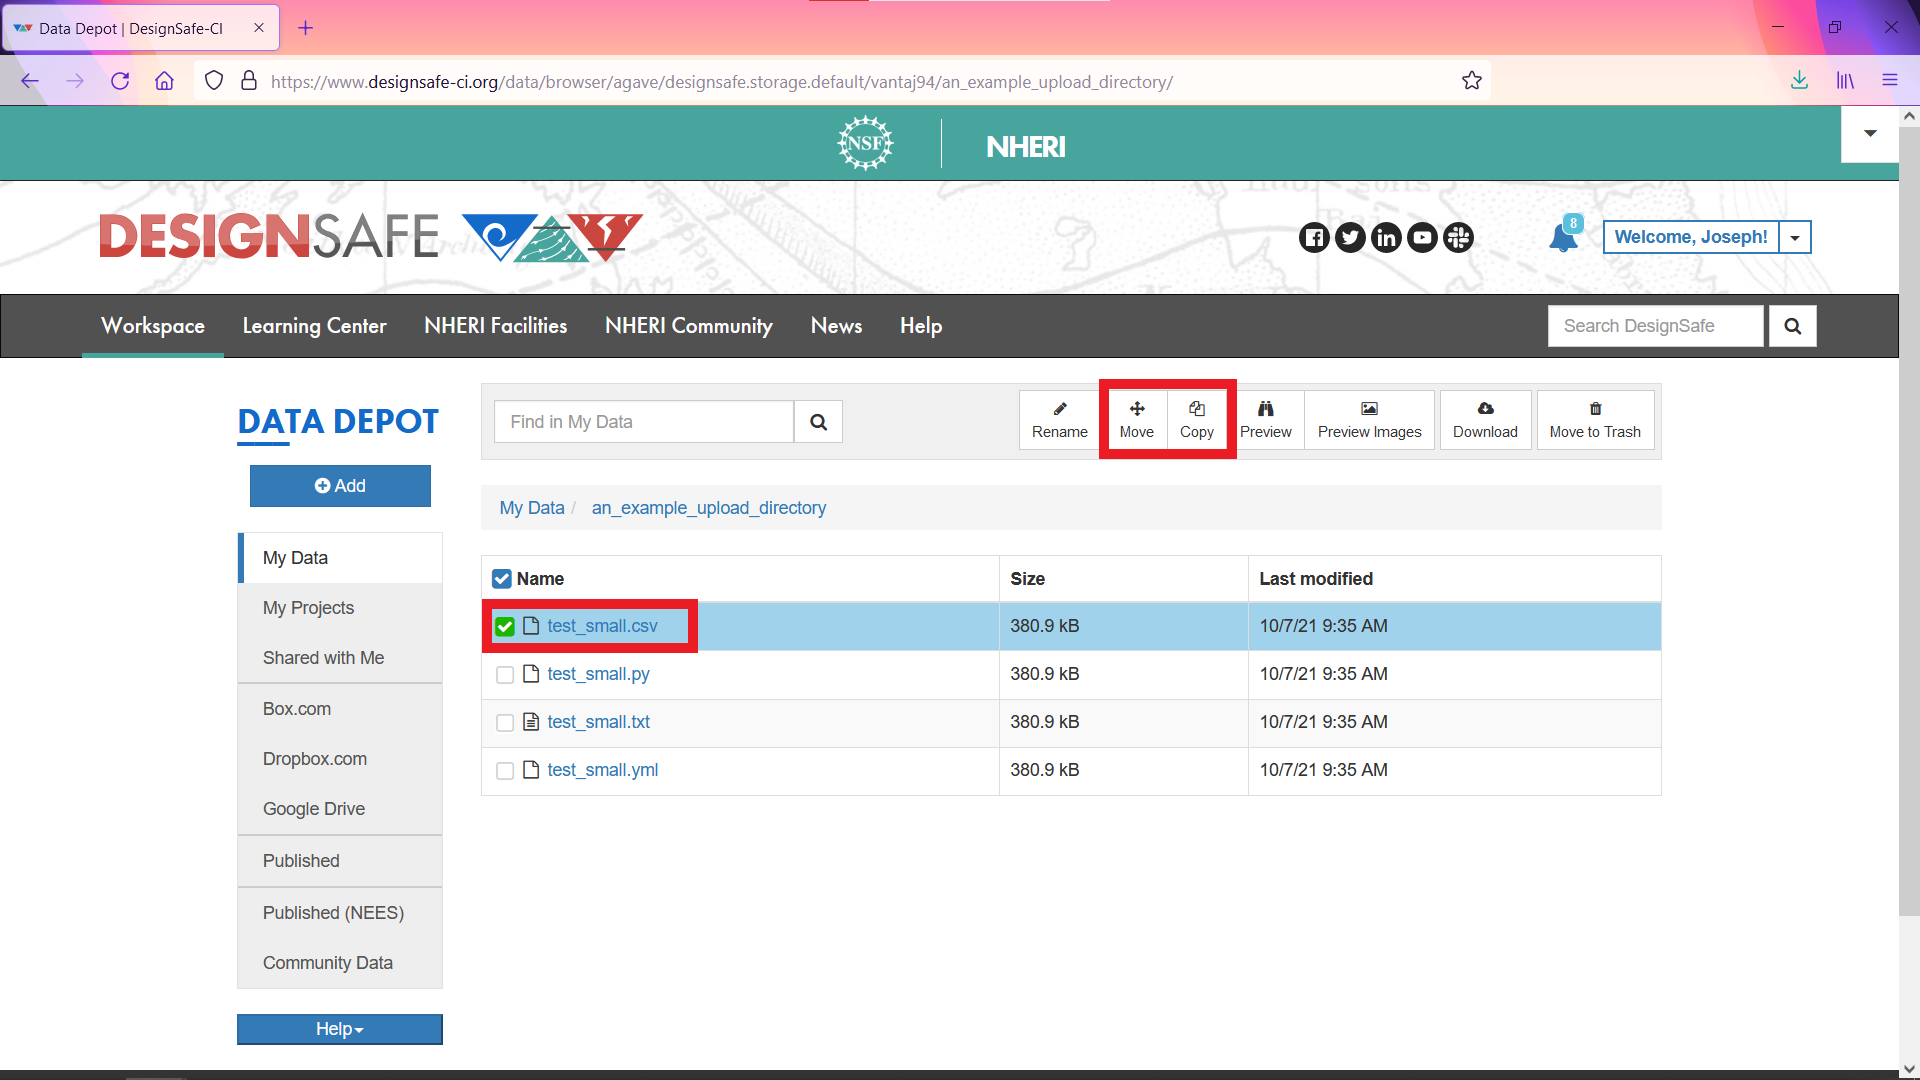
If you selected Move
Navigate to the new destination and press Move Here.
Note that you cannot move files between main directories, such as My Data and My Projects, however may copy between them. See instructions below for details.
If you selected Copy
Use the drop down menu in the top left to switch between main directories, such as My Data and My Projects, navigate to the new destination, and press Copy Here.

JupyterHub's Browser-Based Data Transfer Guide
The DesignSafe JupyterHub provides a convenient way to upload and download small amounts of data ( < 100 MB, < 25 files).
To Upload a File Through Jupyter
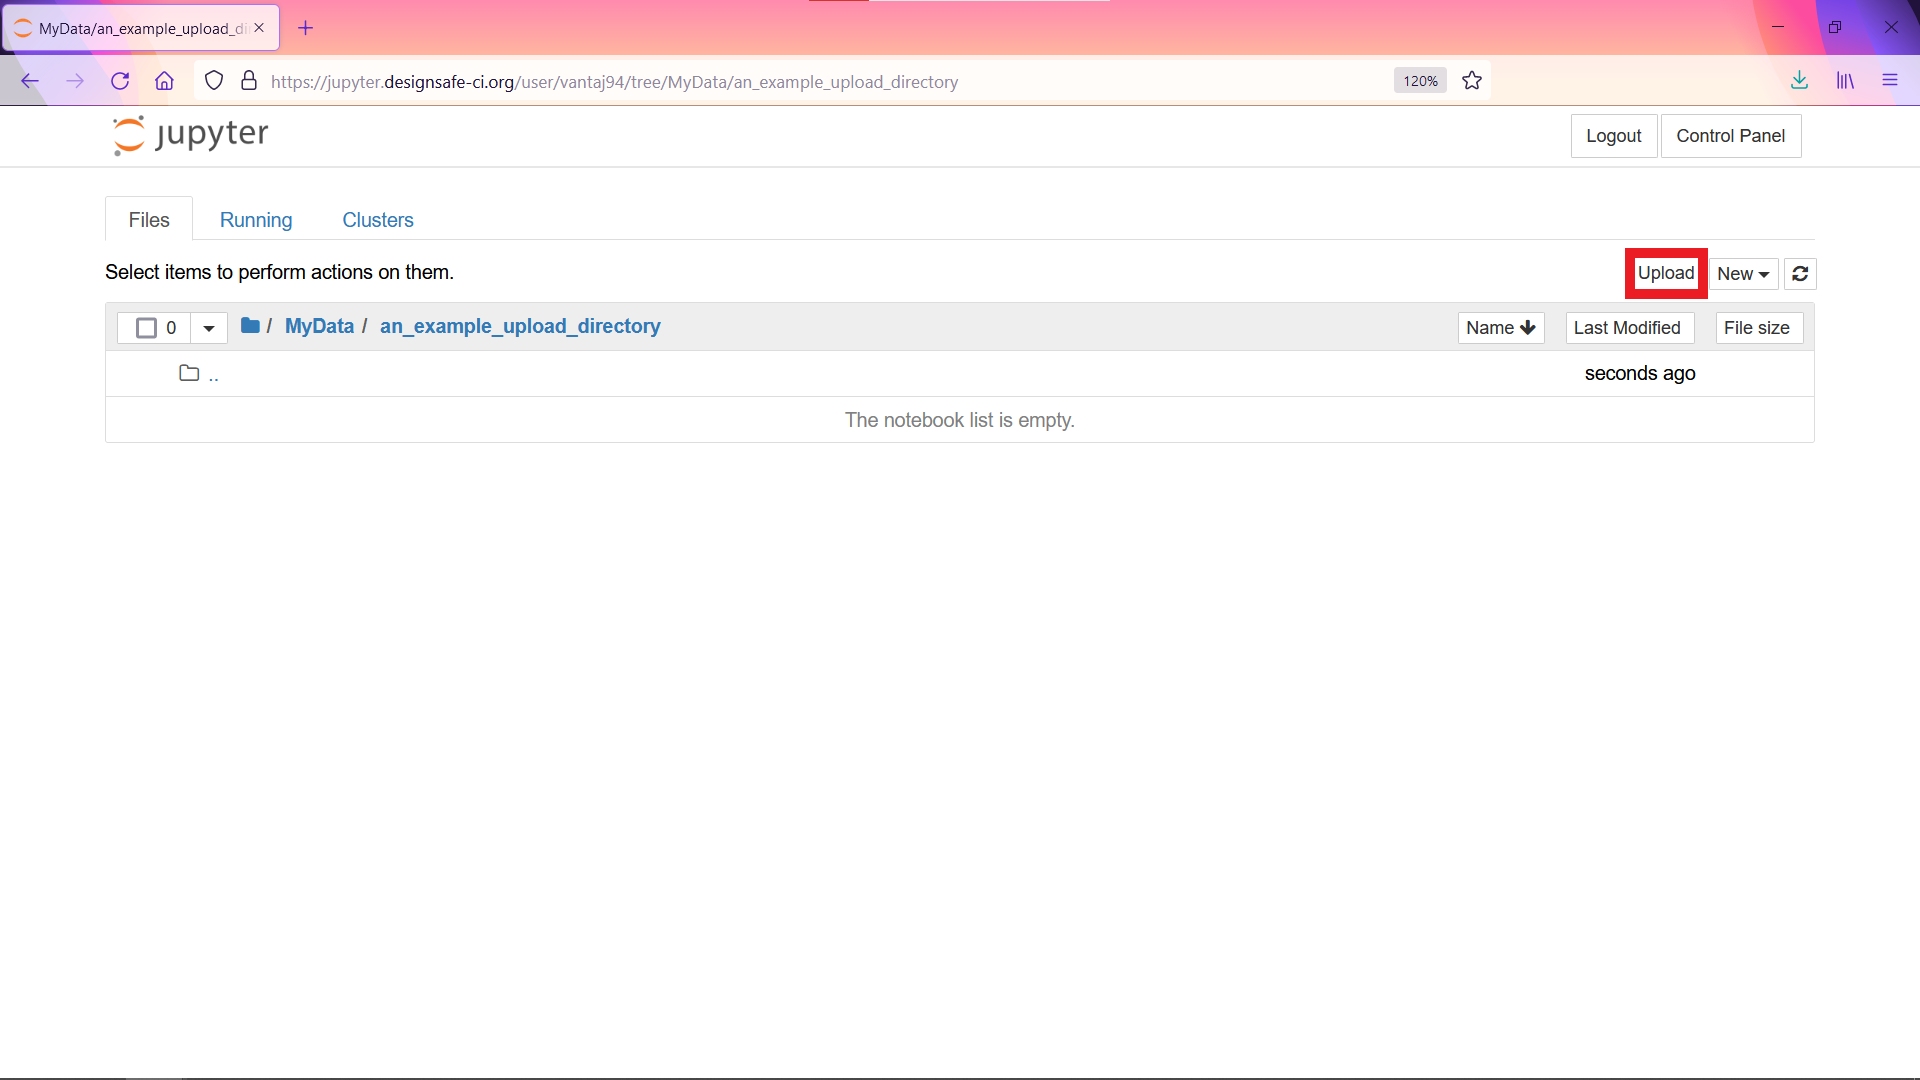
Launch Jupyter by logging into DesignSafe and going to Workspace > Tools & Applications > Analysis > Jupyter > Select Jupyter from dropdown.
When your session has launched you will see a directory structure similar to that shown below.
Select MyData.
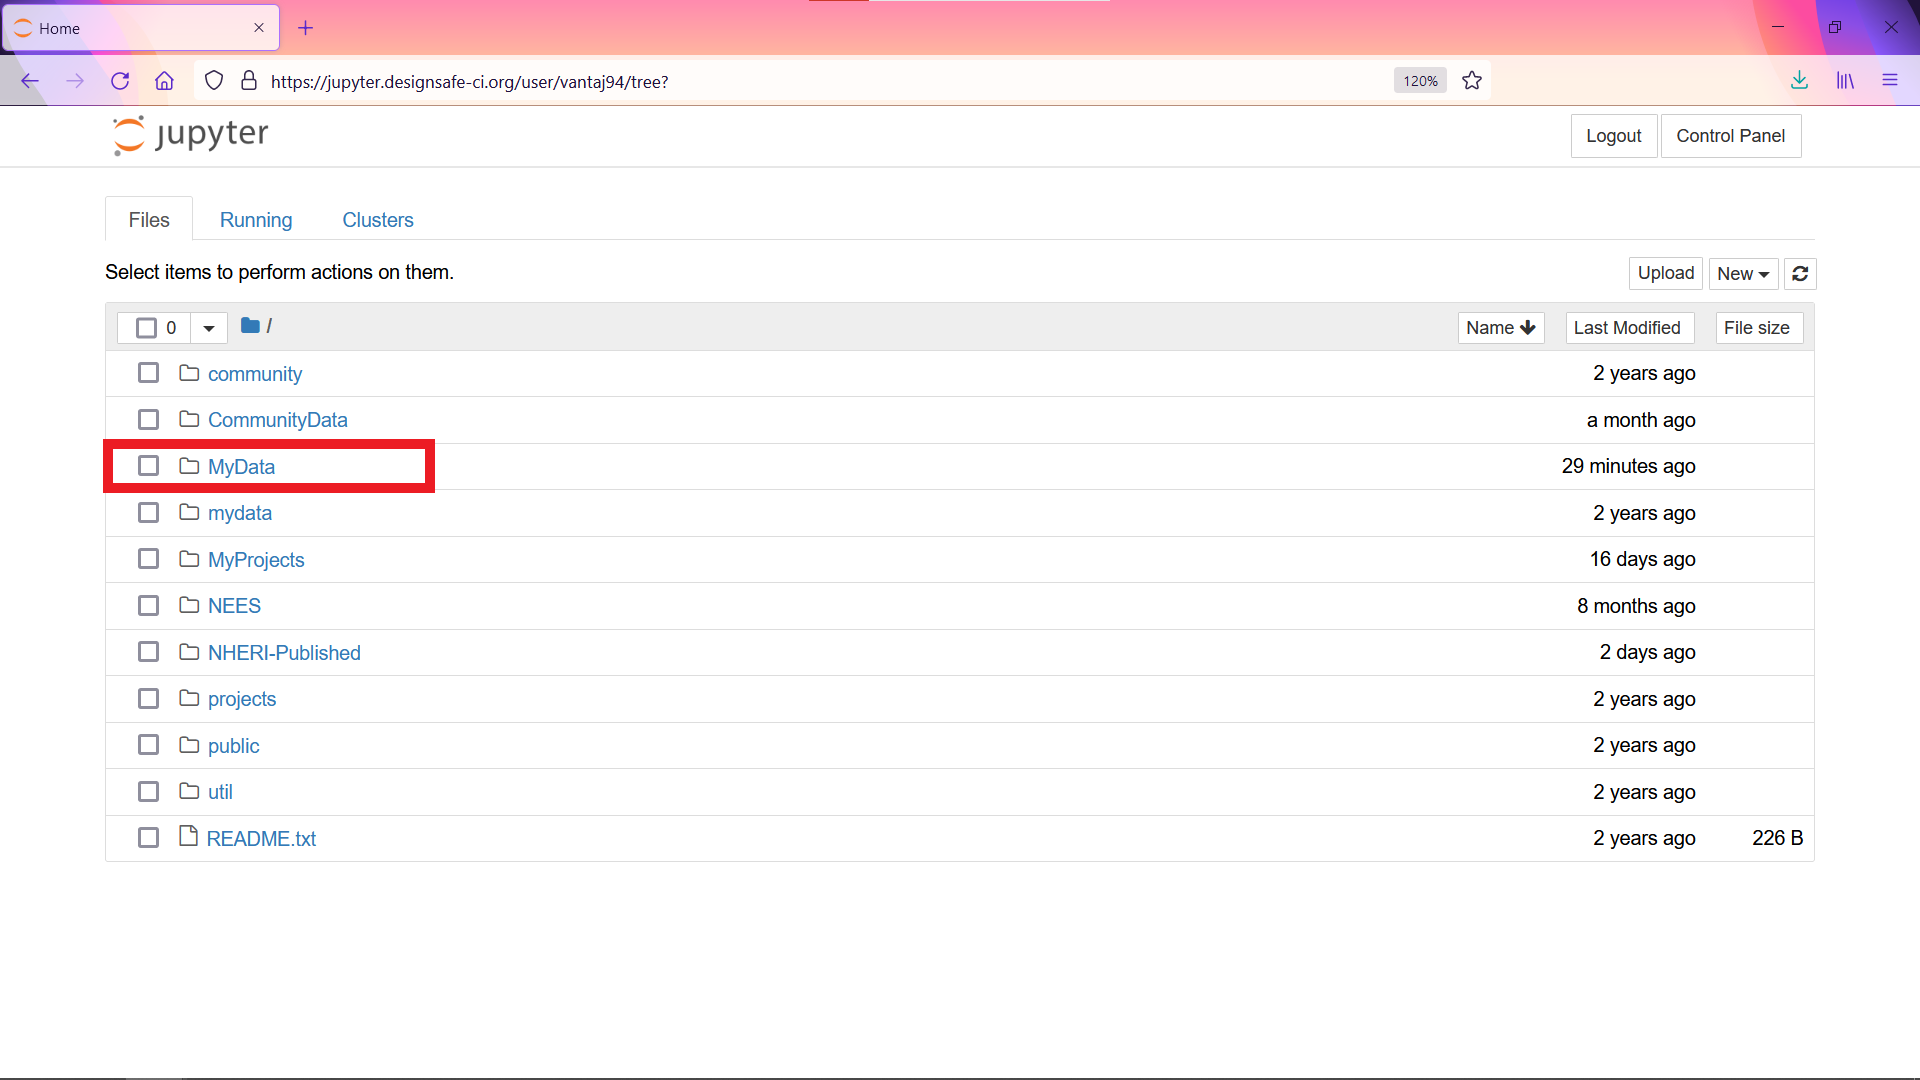
Navigate to the directory where you wish to upload.

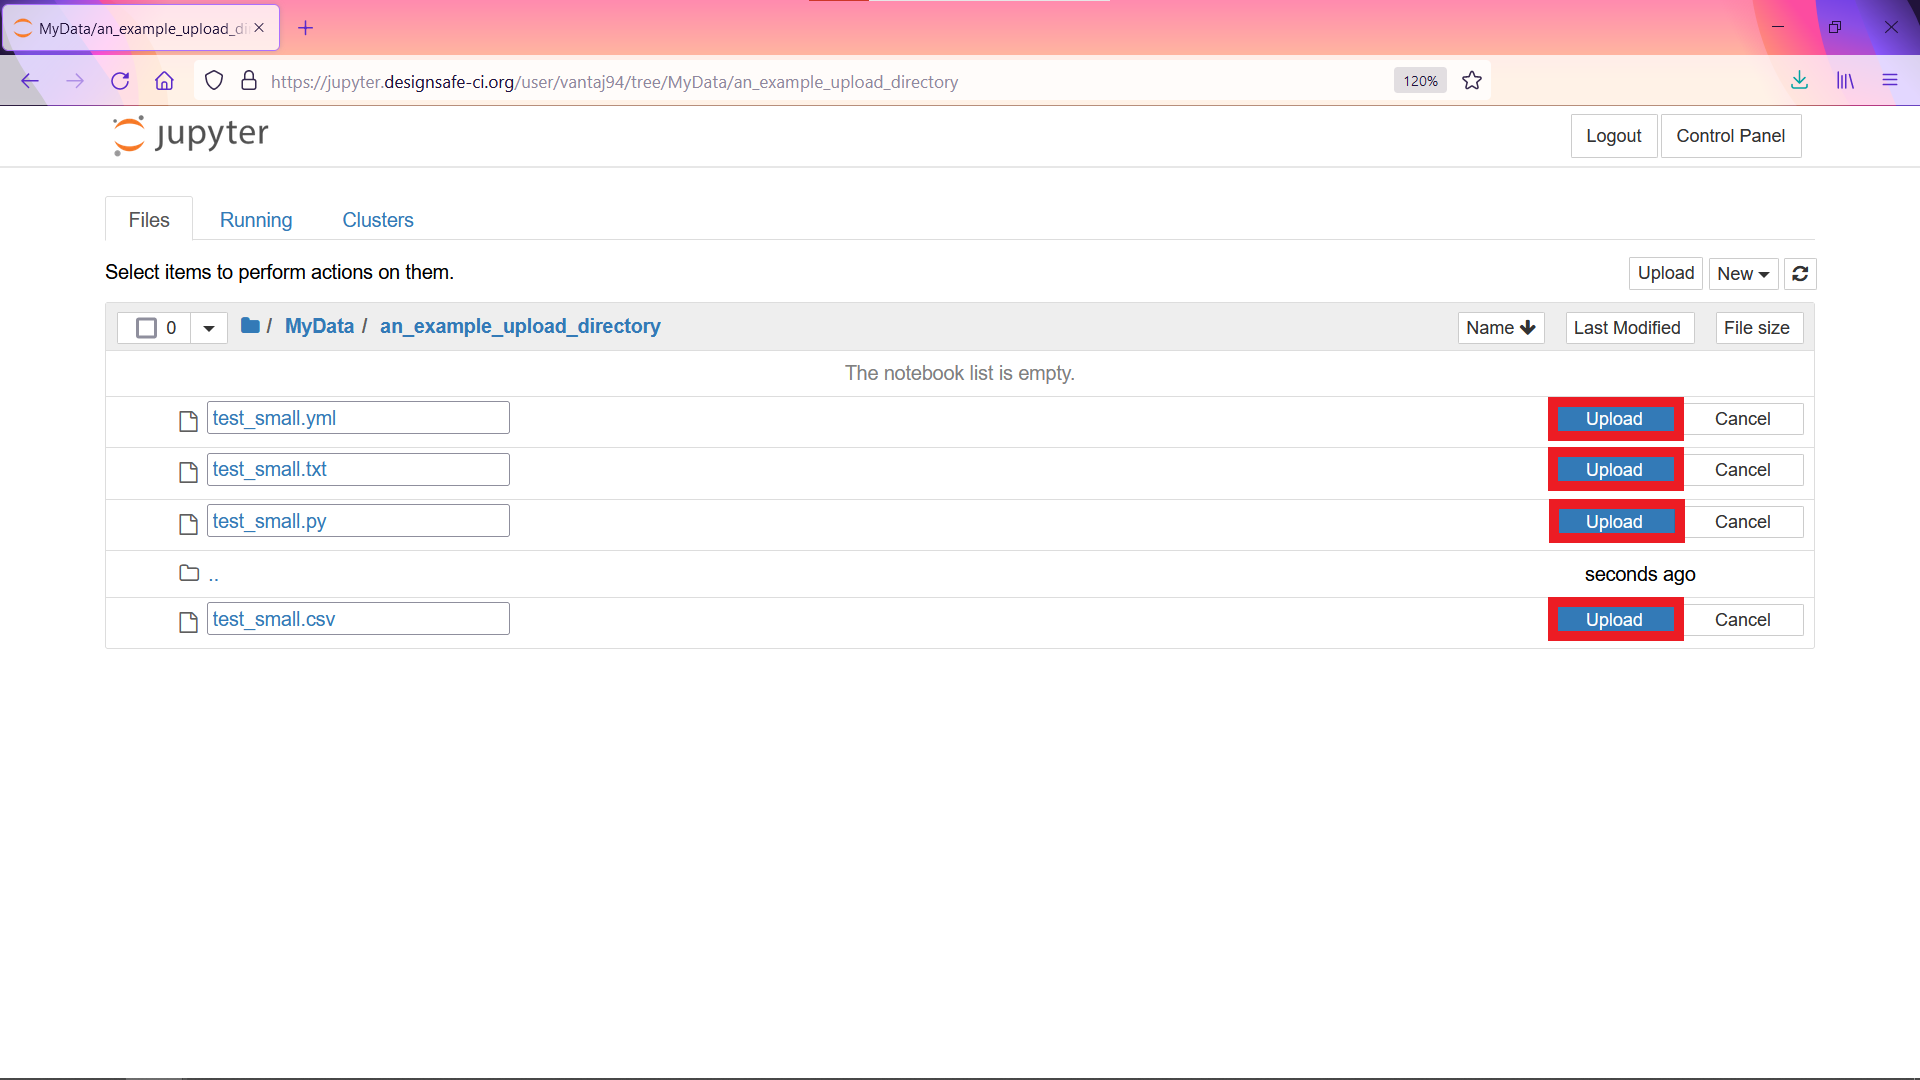
Select Upload
Select the file(s) you wish to upload and press OK. You will now see the files have been queued for upload. Click Upload for each queued file.
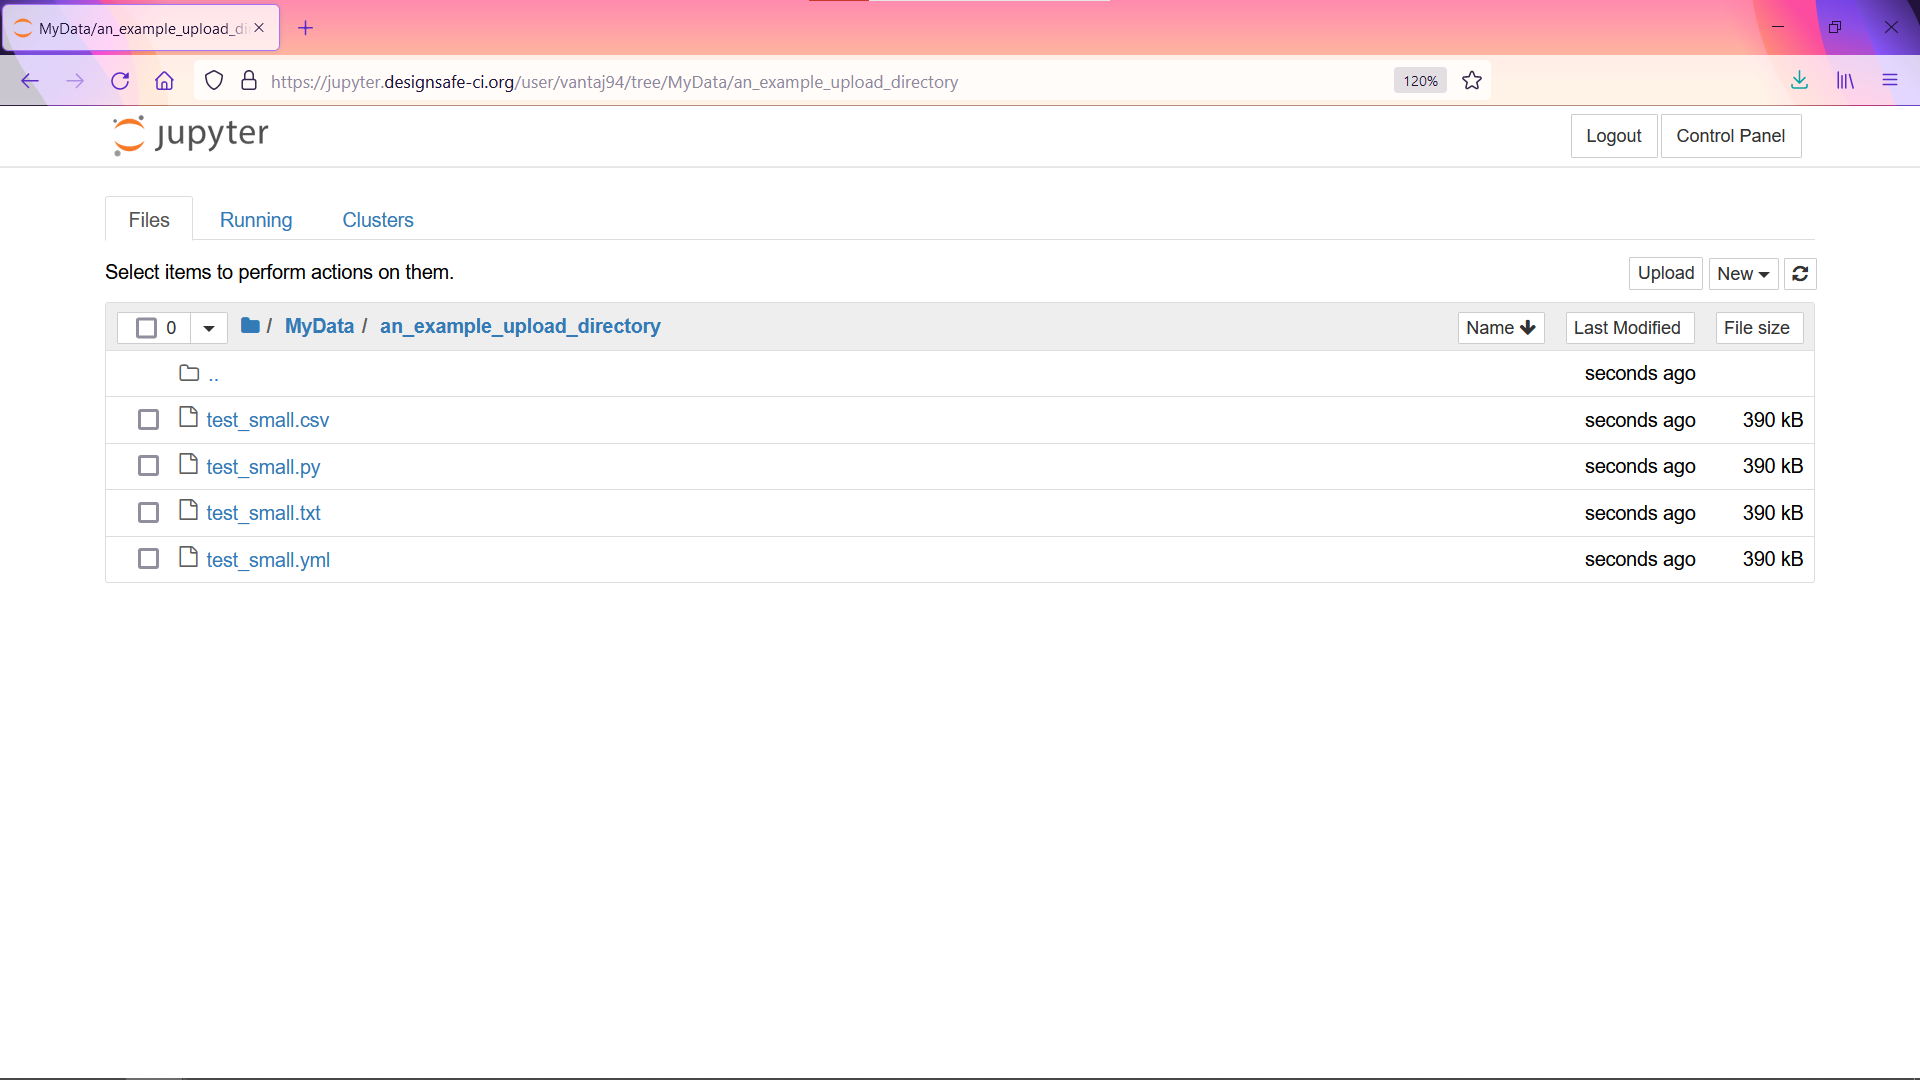
After the upload is complete the files will be viewable in Jupyter.
If you would like to upload an entire folder, please use one of the large data transfer methods listed in this guide.
To Download a File Through Jupyter
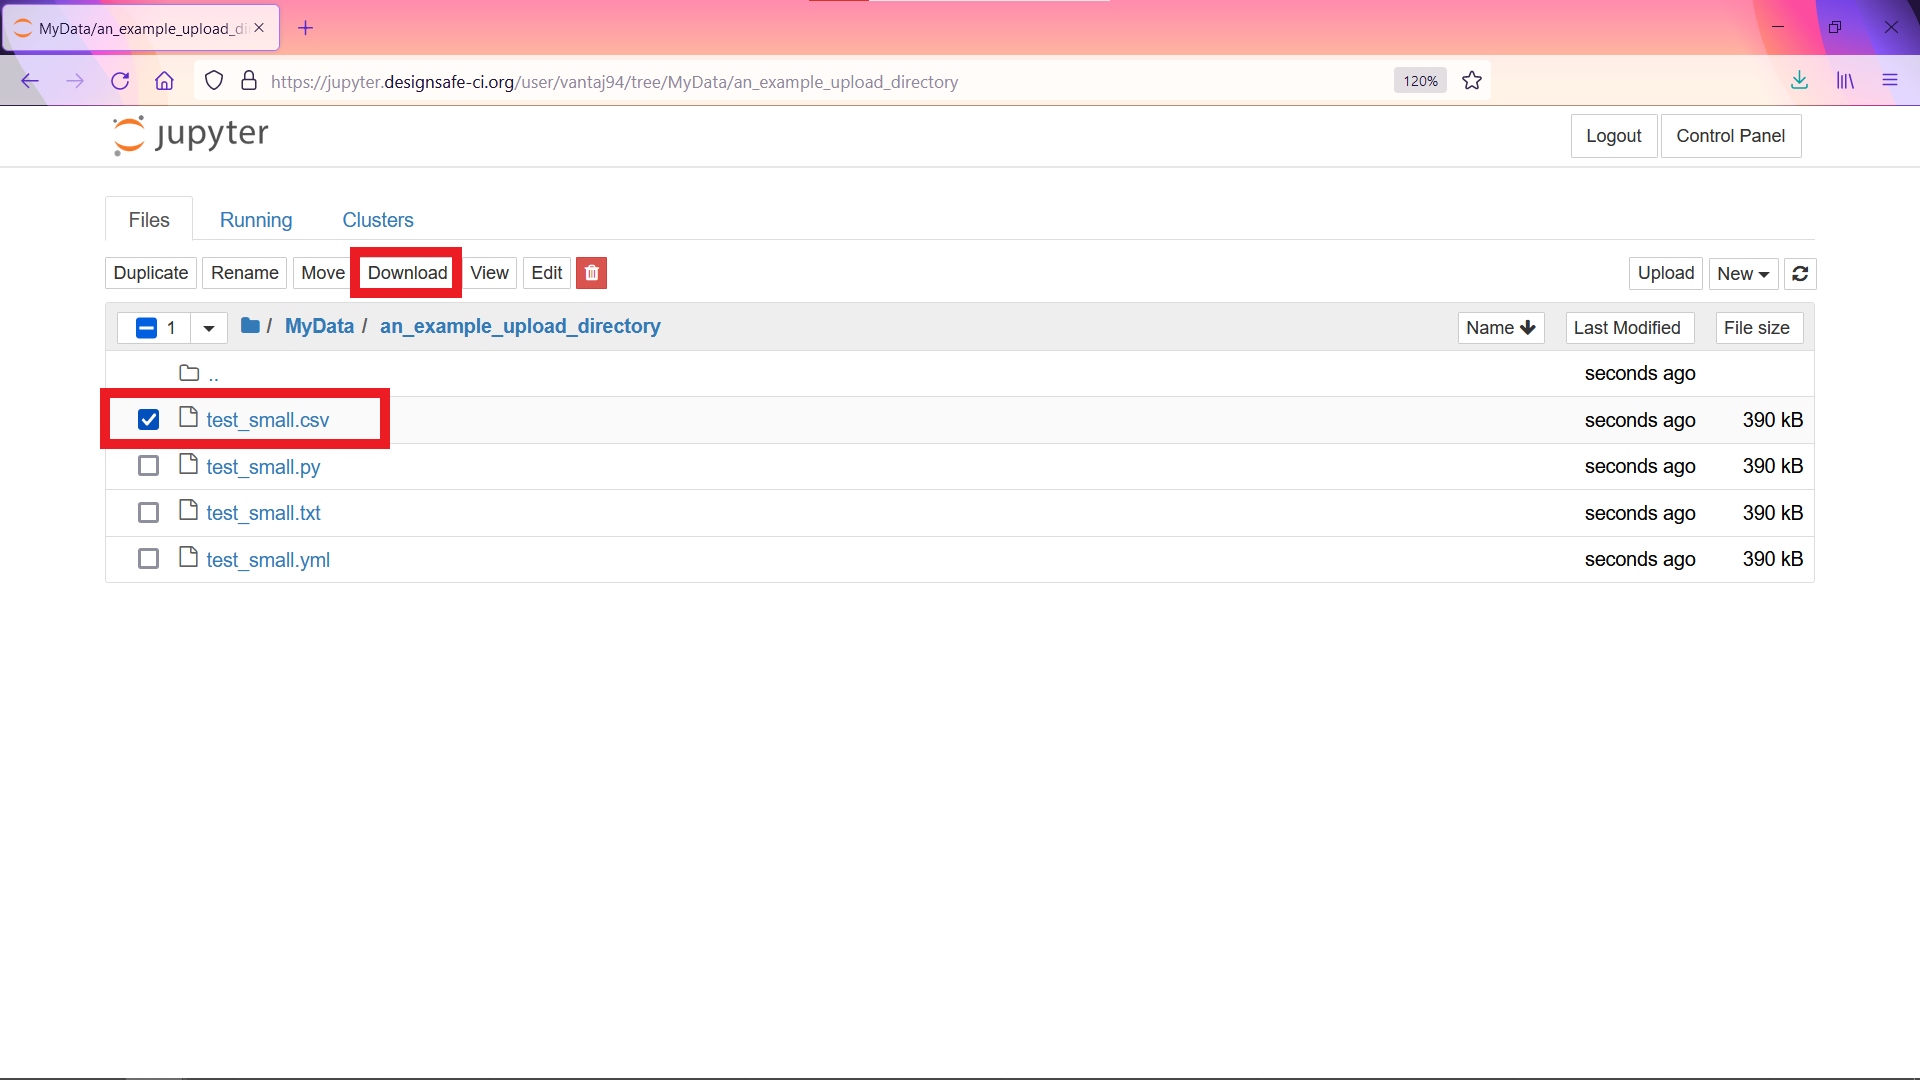
To download a file, select the file then select Download.
Note depending on how you have configured your browser, it will either download the file directly to your default downloads directory or will prompt you to save the file in a location of your choice.
If you would like to download an entire folder, please use one of the large data transfer methods listed in this guide.
Cloud Storage Transfer
DesignSafe provides users the capability to connect to their preferred cloud storage provider.
Once connected, data held on the selected cloud storage provider can be easily copied to and from DesignSafe. Note DesignSafe does not actively synchronize your data and so any copy operation must be initiated manually. Any changes you make to data transferred to DesignSafe from a cloud storage provider will not affect the files located on the cloud storage provider. To update the files on the cloud storage provider you must manually copy them back to the provider using the copy functionality in the DesignSafe browser interface.
The three main cloud storage providers, Box, Dropbox,and Google Drive, are supported on DesignSafe. Detailed instructions for setting up these integrations is provided below.
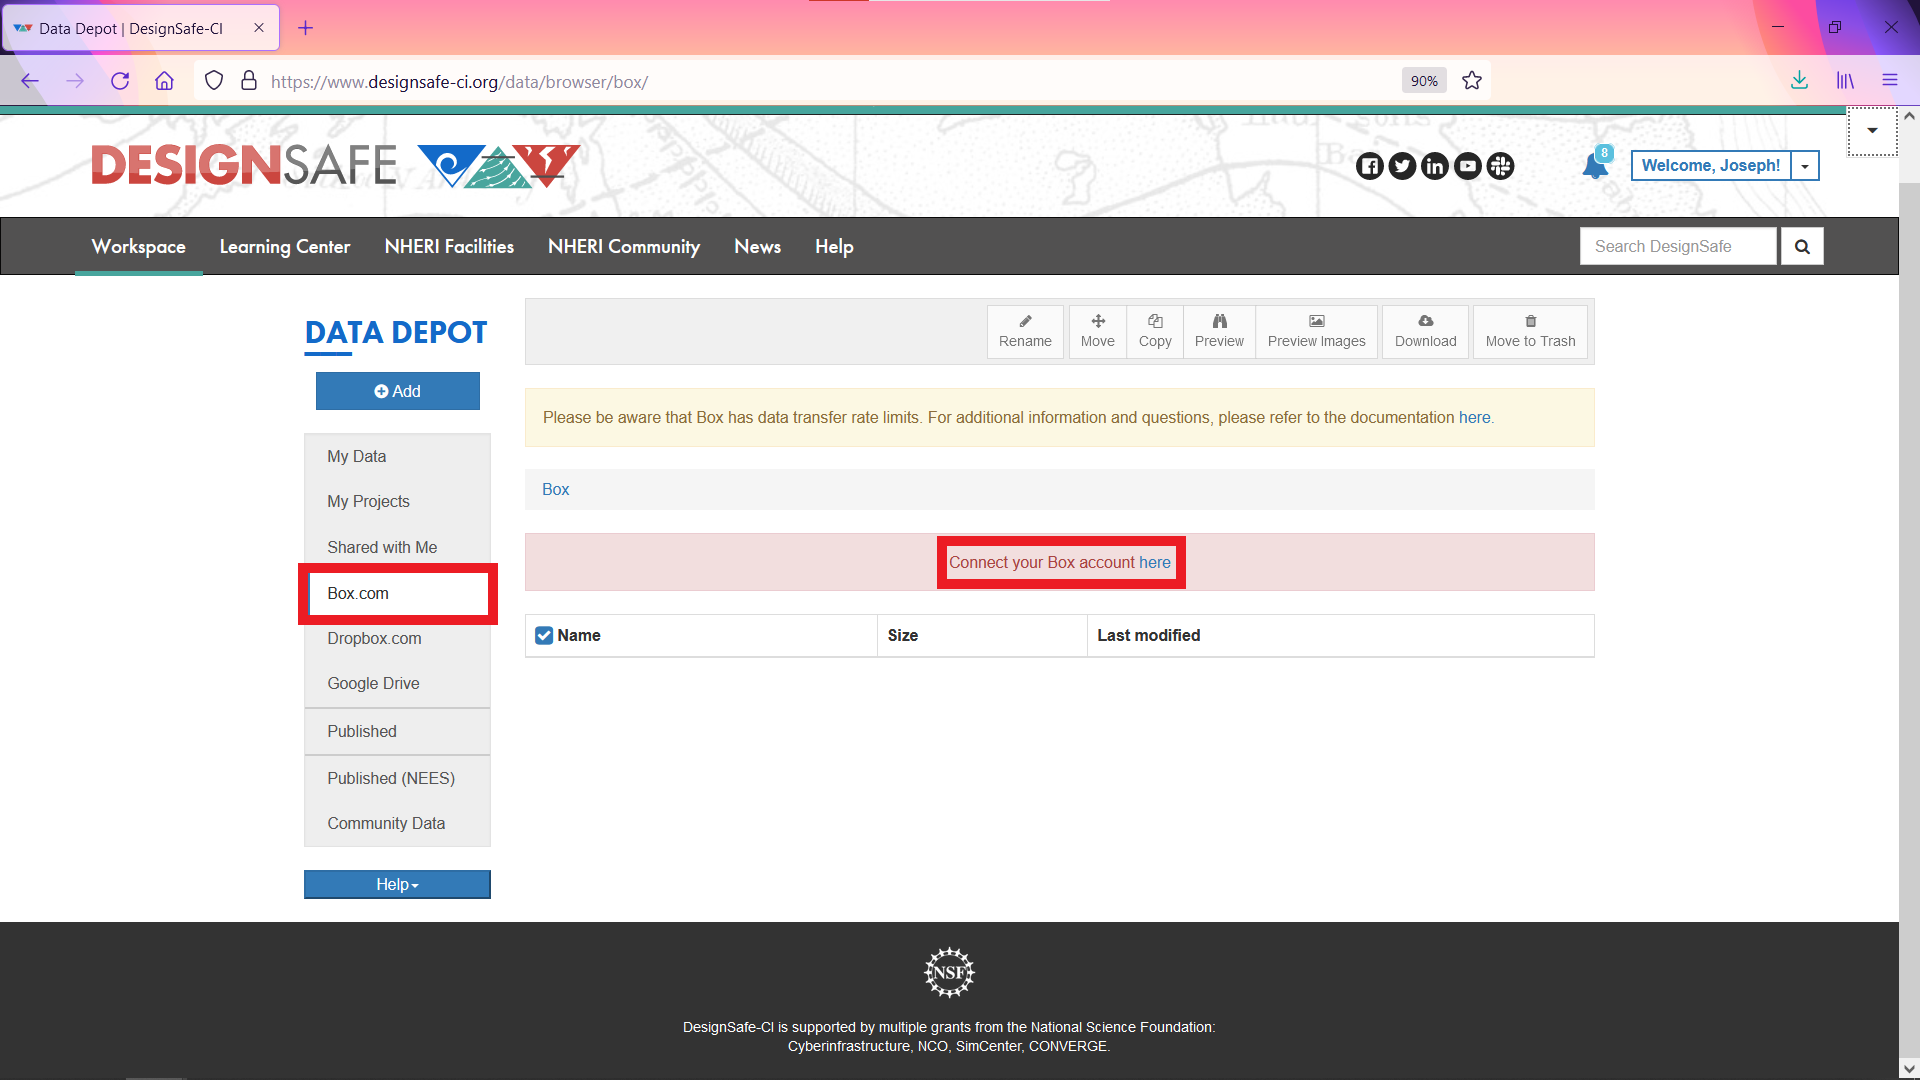
Box
Login to DesignSafe and go to Workspace > Data Depot > Box.com.
Click here to connect to your Box account.
Click Setup Box.com.
Follow the on-screen instructions to login to your Box.com account.
Return to the Box.com section of the Data Depot. You can now copy files to and from your Box.com account. For instructions on copying data in DesignSafe see the Data Depot's Browser-Based Data Transfer Guide.
Dropbox
Login to DesignSafe and go to Workspace > Data Depot > Dropbox.com.
Click here to connect to your Dropbox account.
Click Setup Dropbox.com.
Follow the on-screen instructions to login to your Dropbox.com account.
Return to the Dropbox.com section of the Data Depot. You can now copy files to and from your Dropbox.com account. For instructions on copying data in DesignSafe see the Data Depot's Browser-Based Data Transfer Guide.
Google Drive - CURRENTLY NOT FUNCTIONAL
GOOGLE HAS MADE CHANGES THAT WE ARE WORKING THROUGH TO REENABLE (status as of January 11, 2023)
Google has made changes that we are working through to reenable.
Login to DesignSafe and go to Workspace > Data Depot > Google Drive
Click here to connect to your Google Drive account.
Click Setup Google Drive.
Follow the on-screen instructions to login to your Google Drive account.
Return to the Google Drive section of the Data Depot. You can now copy files to and from your Google Drive account. For instructions on copying data in DesignSafe see the Data Depot's Browser-Based Data Transfer Guide.
Data Management Plan Guidance
This document is intended as a Data Management Plan (DMP) guide that you can customize for the specific details of your research project that will use the NHERI DesignSafe cyberinfrastructure (CI). There is guidance on the five main DMP areas required by the National Science Foundation (NSF), along with information about the DesignSafe CI functionalities that can support your data management needs.
Experimental Facility Checklist
DesignSafe-EF Onboarding Checklist for Data Curation
DesignSafe has been developed as a comprehensive research environment supporting a range of activities from research planning to cloud-based data analysis to data curation/publication. We encourage users to take full advantage of the DesignSafe capabilities associated with both the Data Depot data repository and the Tools and Apps. To learn more about all of these capabilities, watch this Introductory Webinar.
Phase 1 - Before arriving to the Experimental Facility (EF):
- Create an account on DesignSafe: Account Registration
-
Familiarize yourself with the Data Depot and the curation process.
- User Guide for Data Curation and Publication: User Guide
- Watch the data curation and publication tutorial available in the learning center: Video Tutorial
-
Look at examples of well curated experimental projects:
- Experimental Investigation of Wave, Surge, and Tsunami Transformation Over Natural Shorelines: Reduced Scale Physical Model
- CFS-NHERI: Seismic Resiliency of Repetitively Framed Mid-Rise cold-Formed Steel Buildings
- Progressive Damage and Failure of Wood-Frame Coastal Residential Structures Due to Hurricane Surge and Wave Forces
-
Read the FAQ regarding data curation and publication: Frequently Asked Questions
- Learn about the different data transfer methods to identify which one you may need for data upload: Data Transfer Guide
-
Familiarize yourself with the available Tools and Apps.
- Tools and Apps User Guide
- Python scripts in Jupyter can be used for real-time data analysis within the Data Depot.
- Add a Project within the Data Depot.
- This Project may be created by any research team member (PI/co-PI/student) or it may already exist from a previous phase of the research project.
- Make sure that all PIs/co-PIs and team members are added to the project (accessed from the Edit Project link).
- Assign one team member responsible for uploading and coordinating data management activities.
- PIs and co-PIs should be informed and contribute to curation decisions including final publication.
Phase 2 - At the EF:
- The following steps will be completed as a team.
- Upload project data files into your Project as soon as you gather and produce them.
- Include model drawings, sensors, loading inputs, ground motions, material testing, specs, and any experiment planning documents.
- It is best to use open formats for your data such as docx, csv, txt/ascii, tif and other preservation friendly formats (link here to information).
- If possible upload both zipped and unzipped versions of your files to accommodate future data download and data use.
- You may begin the curation process as soon as you start uploading files to DesignSafe. You will continue this process after your work at the EF.
Phase 3 – After the EF:
- Attend Virtual Curation Office Hours. As a team, make an appointment with the DesignSafe Data Curator to discuss data management. Office hours are every Tuesday and Thursday at 1 pm central:
- Curation Office Hours Zoom Link
- Sign up sheet to reserve a time slot: Sign Up Sheet
- Finalize curation of your project:
- Finalize and organize Experiments, Categories, and Relationships.
- Tag files appropriately.
- Ask someone unfamiliar with the project to review the project description to see if it makes sense to a wider audience.
- Publish your project:
- Select Publication Preview to examine the layout of your publication.
- Publish your project using the Prepare to Publish button within the Publication Preview. Confirm the project metadata, files to be published, etc., and then click Request DOI and Publish.
- The project will be publicly available in the Published section of the Data Depot within about 24 hours.
General Comments
- Publishing the data from your project quickly will help you comply with the requirements of your funding sources, allow you to cite your data with a DOI in your upcoming publications and presentations, and bring prompt attention to your work.
- DesignSafe provides the possibility to publish one experiment at a time, so you do not need to finish your entire research project to publish all the experiments.
- You may version your data and thus you can publish the raw data and add later analysis or processed results as version 2.
- The project PI and co PI should be involved in the process to make sure they agree with the data presentation. Clarify with the team the authorship and order of authors.